Roasted Veggie Cutouts

I pulled out my cookie cutters for this fun project! I often work with families whose kids are picky eaters. When they are reluctant to try vegetables, a few tricks work wonders.

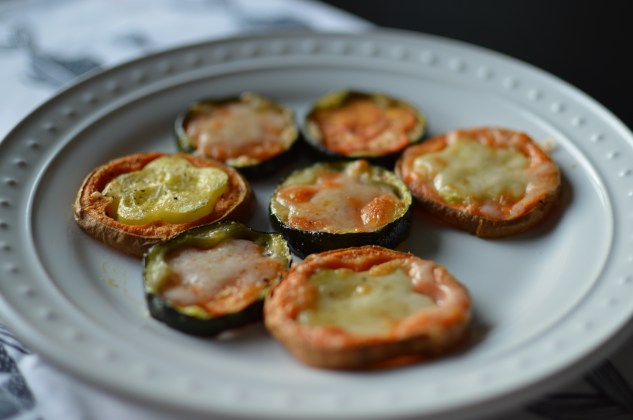
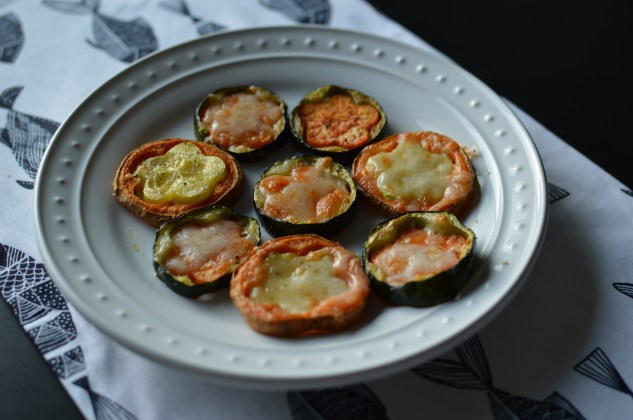
Color, shape, and texture make a huge difference! We eat with our eyes first, so bright colors with contrast work well. I superimposed two brightly colored vegetables by using a single cookie cutter. Simply slice two different firm vegetables or fruits of choice into 1/4″ thick medallions and use a small cookie cutter to punch out the same shape from both types of produce medallions. Next, swap their middles. The fun cutout shapes make the vegetables cuter and more fun to play with. Roasting the veggie medallions caramelizes their natural sugars and brings out a sweeter flavor. The texture becomes softer, but not mushy as it would from boiling.

Top it and dip it! Want to convince your picky eater to try a new vegetable? Try putting cheese on it! These medallions are topped with a broiled Italian cheese blend! Still not quite right? Make these taste like pizza by letting your kiddos dip them in pizza or pasta sauce! You could even get sneaky and puree some steamed veggies into the sauce.

DSC_0006

Roasted Veggie Cutouts

  • Servings: 4
  • Difficulty: easy
  • Print

A fun way to serve vegetables to picky eaters.

Ingredients


1 sweet potato
1 thick zucchini squash
cooking spray
salt & pepper
1/3 cup shredded cheese
1/3 cup pizza or spaghetti sauce (optional)

Directions

  1. Preheat oven to 425 degrees F. While the oven is preheating, slice the sweet potato and zucchini into 1/4″ thick medallions.
  2. Use a small (approx. 1.5″ diameter) cookie cutter to punch a shape out of every vegetable medallion.
  3. Spray an aluminum foil lined cookie sheet with cooking spray. Arrange the medallions on the cookie sheet, leaving about 1/2″ of space between medallions. Swap the centers of the vegetable cutouts to create contrast.
  4. Bake for 10 minutes at 425 degrees F. Flip each medallion combo over using a spatula and bake for 5-10 minutes more, or until golden and tender.
  5. Top each medallion with a sprinkle of shredded cheese. Broil briefly, just until melted and bubbly. Allow to cool slightly and serve with pizza sauce, if desired.

DSC_0009

Check out these other fun fruit and vegetable shapes in this month’s Recipe ReDux!


Carrot Apple Salad with Toasted Walnuts

I received free samples of California walnuts mentioned in this post. By posting this recipe I am entering a recipe contest sponsored by the California Walnut Commission and am eligible to win prizes associated with the contest. I was not compensated for my time. 

Are you ready for a week of delicious walnut recipes?

Walnuts are a delicious and versatile ingredient that is the perfect complement to other whole foods for nutritious, tasty meals and snacks. I hadn’t cooked much with nuts in the past, so I used my sister’s book, called The Flavor Thesaurus by Niki Segnit, to get inspired. This book suggests pairings and ideas for creative cooking. I was impressed by the wide range of foods that walnuts pair with, including cauliflower, grapes, chicken, pear, and many others including the main ingredients in this simple salad recipe: apples, carrots, honey, cinnamon, and ginger!

Walnuts taste bittersweet, but the tannic flavor is minimized when you roast them. This also brings out the roasted nuttiness of the walnuts and enhances their crunchy texture, both of which work wonderfully in this light salad.


Carrot Apple Salad with Toasted Walnuts

  • Servings: 2
  • Difficulty: easy
  • Print

A fresh, sweet, and crunchy summer salad.


Ingredients

1/2 cup walnut halves

1 large green apple

3 medium carrots

1 tablespoon fresh lime juice

1 teaspoon honey (optional)

1/8 teaspoon ground cinnamon

1/8 teaspoon ground ginger

Directions

  1. Preheat the oven to 350 degrees. Place the walnuts in a single layer on a baking sheet and toast for 8-10 minutes, or until fragrant but not dark. Set aside to cool.
  2. Grate the apple and carrots into a large bowl using a box grater or food processor with grater blade.
  3. In a small bowl, whisk together the lime juice, honey, cinnamon, and ginger. Pour over the carrots and apples.
  4.  Chop the walnuts roughly, add to the bowl, and stir everything together. Serve immediately or chill for an hour or two.

I’m not a huge fan of dried fruit, but it would be a fabulous way to add some extra sweetness to this salad. The next time I make it, I may toss in a handful of dried cranberries or raisins. If you try that, let me know if you like it!


Baby Kale and Arugula Salad with Grapefruit Vinaigrette

Do you have the Jaime Oliver app on your smartphone or tablet? I’ve had it for years, but hadn’t used it. He has these awesome tutorial videos on there that teach you basic cooking skills. I really liked the ones about how to pick fresh fish, how to make vegetables taste amazing, and how to make an incredible salad. The dressing recipe for my post today is based on his tips! The fresh baby kale and arugula in the salad are from The Gilcrease Orchard here in Las Vegas. If you live in the area, you should definitely check it out. You can pick your own fruits and vegetables from the orchard and buy them for around $1 per pound. It’s amazing how much produce can grow in the desert! 

Colby and I started an indoor herb garden with basil, thyme, rosemary, parsley, and sage. By started I mean we bought the potted herbs from Trader Joe’s and are trying not to kell them… I’d love to start a little herb and vegetable garden in our backyard this year. I am very inspired to start a garden after meeting with the executive director of Create a Change Now Foundation. The organization builds gardens in at-risk elementary schools in Southen Nevada and develops nutrition education programming centered around the garden in an effort to reduce childhood obesity rates here. 

My coworker and I attended a fundraising dinner for the organization a few weeks ago. The kids harvested 119 pounds of produce from their school garden and local chefs prepared a delicious meal using the vegetables grown there. It was very cool to see! I am hopeful that we will be able to put a garden in at my office, too. We work with overweight children and their families, so having a garden on site would be an amazing resource!

Anyway, here’s a sweet and citrusy salad recipe for you!

Ingredients:

For the dressing:

2 tablespoons olive oil

1/2 tablespoon fresh lemon juice

1/2 tablespoon grapefruit juice

1-2 teaspoons honey

Salt & pepper to taste

For the salad:

2 cups baby kale

2 cups baby arugula

1 cup diced fresh fruit (I used oranges and raspberries)

1 tablespoon chopped mint leaves (optional)

Preparation:

Whisk together the dressing ingredients and drizzle over the salad ingredients. Toss together gently using your hands and top with freshly ground black pepper. Enjoy!


Turkey Stuffed Acorn Squash

This recipe tastes like Thanksgiving. It’s February, but that’s ok! In fact, I’ll be roasting our Thanksgiving turkey this month. I read in Cooking Light Magazine that carving the turkey first and then roasting the individual pieces yields better results. I’ll be sure to share how it turns out!

In the meantime, make this tasty dish that’s hearty and flavorful!

3B76020D-E3DB-4C31-B15B-BABF139A0E9F

Ingredients:

(Makes two halves, 4 servings)

1 acorn squash, cut horizontally and seeds removed

Cooking Spray

1 lb lean ground turkey

1 tablespoon olive oil

1 cup diced celery

1 cup diced onion

2 cloves garlic, minced

1/4 cup diced cranberries

1 tablespoon chicken broth concentrate (or 1 bouillon cube dissolved in 1 tablespoon boiling water)

1 teaspoon dried sage

1 teaspoon dried thyme

Freshly ground pepper

B7F659DF-76D4-4D53-9427-BF365BB8C12C

Preparation:

  1. Roast the acorn squash cut side down on an aluminum foil lined baking sheet sprayed with cooking spray at 375 degrees for 45 minutes, or until tender.
  2. 10 minutes before the squash is done, brown the ground turkey in a 10″ nonstick skillet. Do not drain. Transfer the turkey and any liquid to a separate bowl.
  3. Heat 1 tablespoon olive oil in the 10″ skillet over medium-high heat. Add the celery and onion. Sauté until the onion begins to turn translucent, about 5 minutes. Add the garlic and cranberries. Sauté 1 minute longer, until fragrant. Add the turkey back in, along with the bouillon paste.
  4. Season with sage and thyme. Transfer the meat and vegetable mixture into the acorn squash halves and serve hot, topped with freshly ground black pepper.
  5. If you have leftovers, you can scoop out the acorn squash into a storage container and stir together with the meat filling to make a tasty squash hash.

F7E8AF0E-0EB8-4C1D-BD7F-E49873E80D9E

The concentrated chicken broth really brings out the flavor in this dish. I hope you enjoy it as much as I did!

Perfect Quinoa With Veggies

I’m always surprised when people say they don’t love quinoa. Maybe they’ve been making it wrong. If you’re not convinced that quinoa is great, try this method and you won’t be disappointed!

20140329-080315.jpg

Ingredients
:

1 cup dry quinoa (I used tri-color quinoa)

2 cups chicken or vegetable stock

1 tablespoon butter

1 clove garlic, minced

1/3 cup diced celery

1/3 cup diced onion
1/3 cup diced carrot

1/3 cup diced zucchini

1/2 teaspoon thyme

Salt & pepper

Directions:
1. Heat dry quinoa in a medium saucepan over high heat, stirring frequently until toasted (about 2 minutes).

2. Add chicken or vegetable stock and reduce heat to a simmer. Cover. Cook for 15 minutes or until liquid is absorbed.

3. In a separate frying pan, heat the butter until it bubbles. Add the onions, celery, onion, and garlic. Sauté, stirring often to prevent burning, for about 3 minutes or until the vegetables begin to soften.

4. Add the diced zucchini and thyme to the vegetables and cook for another 1-2 minutes.

5. Stir the cooked vegetables in with the quinoa once it has absorbed all the stock. Season with salt and pepper. Serve warm.

 Confession: I made this recipe a few months ago and forgot to post it! This was before I had my nice camera. Luckily, zucchini is in season a lot of the time in Vegas, so this recipe can be considered “seasonal” in the winter or summer here! For those of you in other parts of the country (or world), the zucchini will taste best and cost the least in summertime! Enjoy and check out some more seasonal recipes below:

Bacon and Eggs Breakfast Salad

Breakfast salad? Yes, please! I wrote this recipe for a contest using Davidson’s Safest Choice Eggs, which are pasteurized using a water bath process that eliminates the risk of Salmonella in eggs without changing their flavor or nutrient composition. These eggs are a a particularly great choice for recipes that do not call for fully cooking the eggs. Examples include smoothies, ice creams, salad dressings, sauces, and poached eggs. 

The poached egg in this recipe combines beautifully with the tangy lemon juice and savory bacon fat to make a dressing that will make a salad lover out of anyone! Don’t worry, it’s lightened up with the use of center cut bacon and substituting olive oil for a portion of the bacon fat. Enjoy this summer salad guilt free as a light dinner with crusty bread or accompaniment to brunch with friends. Oh, and don’t skip the step of massaging your kale! It’s worth the extra effort, as the bitterness of the leafy green will be mellowed by the lemon juice.

  
Ingredients:

1 bunch kale, purple or green

Juice of half a lemon

Dash of salt

1 tablespoon olive oil

4 slices center cut bacon, diced

1 tablespoon thinly sliced red onion

2 tablespoons distilled white vinegar

2 large eggs

2 radishes, sliced

Freshly ground pepper, to taste

Preparation:

1. Begin by tearing the leaves from thicker stems of the kale. Discard the stems and thinly slice the leaves. Place the kale in a large mixing bowl and drizzle with lemon juice, salt, and olive oil.

2. Massage the kale for 2-3 minutes with your hands, or until it is beginning to soften.

3. Cook the diced bacon in a frying pan over medium heat, stirring occasionally until golden. Add the red onion, sauté for 60 seconds longer, and remove from heat.

4. Bring 2 quarts of water to a simmer in a saucepan. Add the white vinegar. Break an egg into a small bowl or cup and gently pour into the simmering water. Using a slotted spoon, gather the egg white around the yolk. Repeat with the second egg. Cook for about 90 seconds for runny eggs, or up to 3 minutes for firmer eggs.

5. Top the massaged kale with the warm bacon and onion mixture and toss to combine. Divide the kale between two plates or shallow bowls. Top with sliced radishes, one poached egg, and freshly ground pepper. 

  
Don’t you love that poaching eggs isn’t as difficult as it seems? I think this method is fool-proof. I hope it works for you, too! 

What are you cooking this summer? Check out the links below for more safe egg inspiration!

*By posting this recipe I am entering a recipe contest sponsored by Davidson’s Safest Choice Eggs and am eligible to win prizes associated with the contest. I was not compensated for my time. 


Turkey and Quinoa Stuffed Peppers

This month’s Recipe Redux theme is “Spring Cleaning!” Clearly, my pantry is still in need of it:

Never mind. I was going to include a picture of the mess in there, but it’s too embarrassing! 

As I was going through my pantry to find an ingredient for this month’s challenge, I found an entire Costco sized package of canned tomato sauce. Well, if you’ve ever accidentally bought too much tomato sauce like I did, I have a great recipe you can put in your lunch or dinner rotation now!

  
Turkey and Quinoa Stuffed Peppers


Ingredients (makes 6):

6 bell peppers: red, orange, and/or yellow

15 oz can tomato sauce

1 cup dry quinoa

2 cups chicken broth or water

16 oz lean ground turkey

2 tablespoons olive oil

1 medium onion, diced

1 small can diced green chilis

3 garlic cloves, chopped

Taco seasoning, to taste

6-12 oz shredded cheese (I used 2% fat Mozzarella)

Preparation:

1. Remove the tops and seeds from each bell pepper. Heat a large pot with enough boiling water to just cover the bottom below a steamer basket. Place bell peppers in the steamer basket and steam, covered, for about 5-10 minutes or until desired tenderness is achieved. You can boil the peppers submerged in water to soften them instead. Remove the peppers, pat dry with a paper towel, and allow to cool on an aluminum lined baking sheet.

2. As the peppers cool, toast the dry quinoa in a saucepan, stirring frequently for 2 minutes. Add 2 cups boiling water or broth and reduce heat to a simmer. Cook covered for 15 minutes or until liquid is absorbed.

3. While the quinoa is cooking, sauté the onions And garlic in 2 tablespoons of oil in a large skillet over medium heat. Once softened and golden, set aside. Brown ground turkey in the pan until there is no pink visible and the meat is in small crumbles. 

4. Stir taco seasoning, tomato sauce, cooked onions, cooked quinoa, and diced green chilis into the turkey. 

5. Distribute the meat and quinoa mixture evenly among the bell peppers, top each one with 1-2 oz shredded cheese, and broil until golden and bubbly.

  
These reheat well in the microwave and pack easily for lunch at work! Enjoy with a side of salad. 

  
Check out other Recipe Redux creations below:

Favorite Workday Salad

I love finding a portable meal that’s flavorful, protein rich, and easy to prepare multiples of for the week! This salad has been my go-to for two weeks now and I’m still not tired of it.

Ingredients:

2 eggs or 3 egg whites, hard boiled & chopped

1/2 can of tuna

1 medium tomato, diced (or 1/2 cup grape tomatoes sliced lengthwise)

2 tablespoons finely diced red onion

1/2 cup garbanzo beans

1 tablespoon fresh chopped parsley

Large handful of spinach or mixed greens

1 tablespoon olive oil

Squeeze of lemon

Salt & pepper to taste

Preparation:

1. Place eggs in a pot of cold water. Bring to a boil. Cover, remove pot from heat, and set a timer for 12-15 minutes. Run the eggs under cold water to stop the cooking process and make them easier to peel.

2. Layer all ingredients except for greens in a bowl or travel container. Add lemon juice, olive oil, salt, and pepper.

3. Top with mixed greens or spinach.

4. When ready to serve, stir or shake to combine all ingredients.

And done! I like to make 2-4 of these at a time to keep in the fridge for lunch on weekdays. They hold up well as long as the spinach/greens are on top!

Enjoy!

Easter Party Recipes

Colby and I just got back from a trip to Sacramento and the Bay Area. We were there for his grandpa’s funeral, but also enjoyed some hiking and restaurants. Grandpa Jim died at the age of 93 after living a full life and shaping a large family of Christ followers. He has 6 children, 16 grandchildren, 27 great grandchildren, and 2 great-great grandchildren! Isn’t that amazing? 

Next weekend is Easter and I will be catering a party for work on Saturday! The menu will consist mainly of healthy, bite-sized appetizers and desserts. Here’s a roundup of fresh springtime recipes to make at your Easter party:

First up, a great tutorial for making professional looking chocolate dipped strawberries from Doll House Bakeshoppe here.


Next up, some easy and gorgeous caprese tortellini bites from Southern Living here.


I’ve been yearning to make something like these adorable phyllo cup Brie bites from A Spicy Perspective for months! Check out the recipe here.


These beet dyed deviled eggs are so pretty and dyed naturally! The recipe is provided at Create by Diane here.


Colorful Peeps and fruit kabobs are beautifully laid out on The Frugal Girls site here.


I like the way Catch My Party styles this simple appetizer of fresh veggies in ranch! Link to it here.


Finally, this fresh farro salad with lightly roasted vegetables looks delightful! The Proud Italian Cook teaches you how to make it here.


Do you have any other favorite Easter party recipes or traditions? Next Sunday we’ll be headed out to Valley of Fire for sunrise service in the desert. I’ll be sure to take pictures! After an Easter nap, I’ll be cooking lamb for the first time. Wish me luck! If it turns out well, I’ll share the recipe with you!

Oh yeah, one more thing. The image for this blog post comes from Martha Stewart’s lace dyed eggs tutorial here. I’ll be making these for our annual egg fight