Brown Butter Baklava Spread

I received free samples of California walnuts mentioned in this post. By posting this recipe I am entering a recipe contest sponsored by the California Walnut Commission and am eligible to win prizes associated with the contest. I was not compensated for my time. 

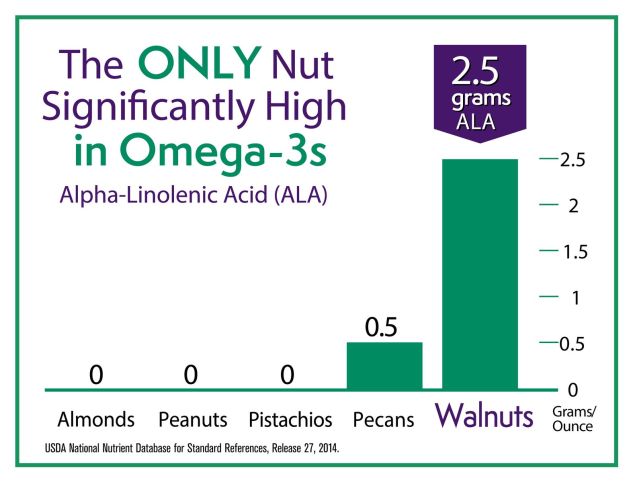
This is easy and delicious recipe is inspired by the flavors in baklava, a traditional rich dessert made of filo layered with chopped nuts and syrup. The original dessert originates from the Ottoman Empire; you can typically find it served at Greek restaurants. As a spread, baklava can be stirred into oatmeal or layered onto fruits and vegetables. If this recipe gets you to eat more fruits, veggies, or whole grains, I call that a win! As indulgent as it tastes, the walnuts in this recipe make it a nutritious snack choice. Walnuts provide important components of a healthy diet – an ounce of walnuts has 2.5 grams of the essential plant-based omega-3 alpha-linolenic acid (ALA), 4 grams of protein, and 2 grams of fiber to keep you feeling full. Read more about walnut nutrition here.

If you have any qualms about enjoying this delicious brown butter baklava spread, think back to this chart and indulge happily:

California Walnuts ALA Chart

Yum!

Baklava Butter

Baklava Spread

  • Servings: 4
  • Difficulty: easy
  • Print

An indulgent and flavorful dessert spread to enjoy with fresh fruit, toast, or even celery sticks!

Ingredients

  • 1 cup walnut halves
  • 2 tablespoons unsalted butter
  • 2 tablespoons honey
  • 1/2 teaspoon ground cinnamon
  • 1/2 teaspoon vanilla extract
  • 1/4 teaspoon salt

Directions

  1. Preheat oven to 350 degrees. Place the walnuts in a single layer on a baking sheet. Toast for 8-10 minutes, or until fragrant but not dark. Allow to cool completely.
  2. While the walnuts cool, heat the butter in a small saucepan until bubbling and beginning to turn golden brown. Do not burn; remove from heat once the butter is fragrant.
  3. Place the walnuts, browned butter, honey, cinnamon, vanilla, and salt in a food processor. Process until the mixture becomes a thick, chunky nut butter. Serve with toasted bread, apple slices, or celery. Alternatively, stir it into oatmeal or leftover quinoa heated with milk.

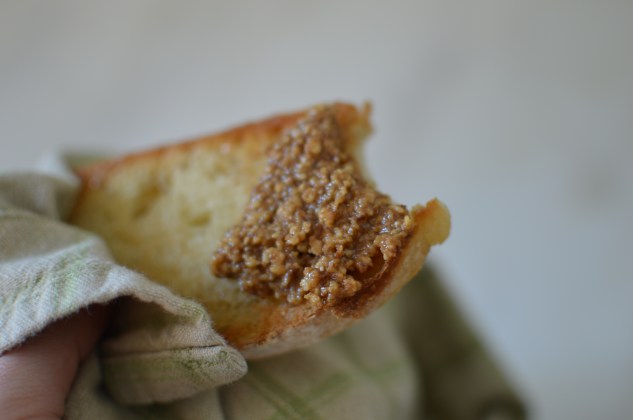
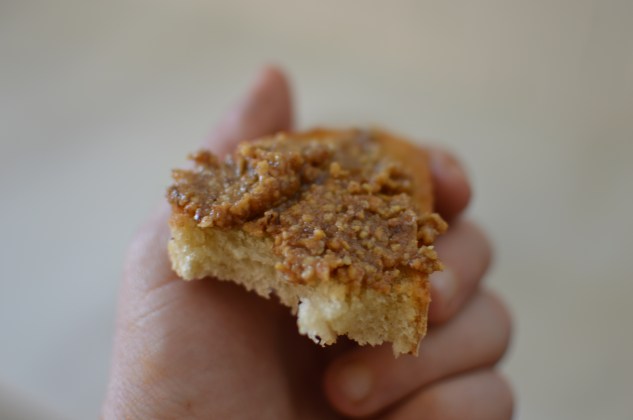
Here it is on toast:

Baklava Sread on Toast

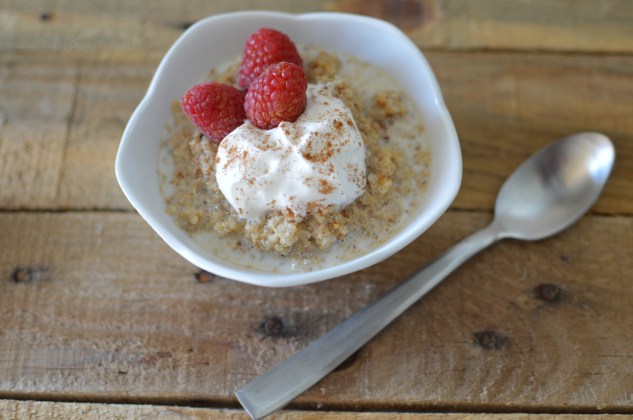
And here it is stirred into quinoa porridge! It’s easier to make than you think- just heat 1 cup of leftover cooked quinoa with 1/2 cup milk of choice and stir in a heaping spoonful of baklava butter.

Quinoa Walnut Porridge

Are you loving these walnut recipes? Check out more ideas below!

Turkey Stuffed Acorn Squash

This recipe tastes like Thanksgiving. It’s February, but that’s ok! In fact, I’ll be roasting our Thanksgiving turkey this month. I read in Cooking Light Magazine that carving the turkey first and then roasting the individual pieces yields better results. I’ll be sure to share how it turns out!

In the meantime, make this tasty dish that’s hearty and flavorful!

3B76020D-E3DB-4C31-B15B-BABF139A0E9F

Ingredients:

(Makes two halves, 4 servings)

1 acorn squash, cut horizontally and seeds removed

Cooking Spray

1 lb lean ground turkey

1 tablespoon olive oil

1 cup diced celery

1 cup diced onion

2 cloves garlic, minced

1/4 cup diced cranberries

1 tablespoon chicken broth concentrate (or 1 bouillon cube dissolved in 1 tablespoon boiling water)

1 teaspoon dried sage

1 teaspoon dried thyme

Freshly ground pepper

B7F659DF-76D4-4D53-9427-BF365BB8C12C

Preparation:

  1. Roast the acorn squash cut side down on an aluminum foil lined baking sheet sprayed with cooking spray at 375 degrees for 45 minutes, or until tender.
  2. 10 minutes before the squash is done, brown the ground turkey in a 10″ nonstick skillet. Do not drain. Transfer the turkey and any liquid to a separate bowl.
  3. Heat 1 tablespoon olive oil in the 10″ skillet over medium-high heat. Add the celery and onion. Sauté until the onion begins to turn translucent, about 5 minutes. Add the garlic and cranberries. Sauté 1 minute longer, until fragrant. Add the turkey back in, along with the bouillon paste.
  4. Season with sage and thyme. Transfer the meat and vegetable mixture into the acorn squash halves and serve hot, topped with freshly ground black pepper.
  5. If you have leftovers, you can scoop out the acorn squash into a storage container and stir together with the meat filling to make a tasty squash hash.

F7E8AF0E-0EB8-4C1D-BD7F-E49873E80D9E

The concentrated chicken broth really brings out the flavor in this dish. I hope you enjoy it as much as I did!

Thai Steak Frittata

I sooo wanted to enter this recipe in the Beef Checkoff recipe contest because I think it stands a good chance of winning. Unfortunately, the nap I took this evening took a little too long and I didn’t post it in time. It’s ok though, I’m more interested in sharing it with you all because it’s awesome.

I had leftover steak from this recipe and wanted to use it to create a breakfast recipe. The frittata I came up with is pretty legit and takes only a few minutes to make!

  
Ingredients:

(serves 4)

8 oz leftover cooked steak, diced small

1/4 cup diced onion

1/4 cup diced bell pepper

1 tablespoon canola oil

Half a medium zucchini, grated

1 clove garlic, minced

1 tablespoon reduced sodium soy sauce

6 eggs

1/4 cup milk

1/4 cup shredded cheddar cheese (optional)

2 tablespoons chopped green onion

Sriracha sauce, for serving

Preparation:

1. Heat canola oil in an oven safe 10″ nonstick skillet over medium-high heat. Sauté the steak, onion, and bell pepper for about 1 minute before adding the zucchini, garlic, and soy sauce. Cook for an additional minute. Turn down the heat to low while performing the next step.

2. Whisk together the eggs and milk in a medium mixing bowl. Pour the egg mixture over the steak and vegetables.

3. Turn the heat up to medium and cook for about 3-5 minutes, or until the bottom of the frittata is set and the top is beginning to set around the edges. Sprinkle with grated cheese and green onion.

4. Transfer the skillet to the oven and broil for another 3-5 minutes, or until the top is golden and the eggs are fully set.

5. Serve immediately with sriracha sauce or allow to cool before storing in the fridge.

Leftover frittatas make great salad toppers! They’re tasty cold, so there’s no need to reheat if you want to save some for the work week. If you decide to freeze this dish, let me know how it is after it defrosts. 

  
I’m pretty sure my skillet isn’t intended to be placed in the oven over 400 degrees. I’m glad the handle didn’t melt! 

  One last thing! If you want to cut some calories from this recipe, use a lean cut of steak, such as flank or skirt steak, and swap 3 of the eggs with 6 egg whites. You probabaly won’t even taste the difference. 

Avocado Chicken Salad

There are ingredients you should always have on hand in the summertime for easy, no-cook meals. Today’s recipe features most of my favorites. 

Rotisserie chicken – Less expensive than buying a whole, raw chicken! How could you pass this up? Use it in salads, on sandwiches, or serve with grilled vegetables this summer.

Avocado – Perfect on everything, from eggs to salads and sandwiches to guacamole on chips. 

Tomatoes, Red Onions, Limes, and Fresh Herbs – No need to cook these fresh tasting produce items! They’ll brighten up any summer meal. 

Since getting back from vacation I feel like working all day takes up so much time that I just don’t want to spend more than 20 minutes in the kitchen in the evening. I’d rather spend my nights feeling like I’m still on vacation with a glass of wine on the patio. This chicken salad is very refreshing with white wine. Try it with this amazing find at Trader Joe’s:

 
Pancake Cellars’ Big Day White is dangerously drinkable. It offers flavors of white peach, apple, cantaloupe, orange blossom, honeysuckle, and lemongrass. At least that’s what it says on the label. To me it just tastes like summertime perfection! Oh, and did I mention it’s only $5.99? 

Pour yourself a glass and get started on the salad!


Ingredients:

(Serves 1)

1 cooked chicken breast (5-6 oz, skin removed)

1 roma tomato, diced

2 tablespoons finely diced red onion

1/2 an avocado, diced

1/2 a lime, juiced

1/4 teaspoon cumin

Dash of salt and pepper

1 tablespoon fresh cilantro or parsley, chopped (optional)

Preparation:

1. Gently fold together all ingredients in a mixing bowl and serve. Boom.

Easy, right? I just took a break from house cleaning for 10 minutes to make and eat this. Tidying up the house is much more fun with a glass of wine, Spotify’s “Cleaning the House” mix playing, and fueled up with this refreshing salad. 

  
I used rotisserie chicken in my salad, but you could easily use poached or grilled chicken breast instead. I’ll bet this is good with a swirl of Greek yogurt or sour cream added in. Enjoy!

What are your favorite summer meals and wines? 

Bacon and Eggs Breakfast Salad

Breakfast salad? Yes, please! I wrote this recipe for a contest using Davidson’s Safest Choice Eggs, which are pasteurized using a water bath process that eliminates the risk of Salmonella in eggs without changing their flavor or nutrient composition. These eggs are a a particularly great choice for recipes that do not call for fully cooking the eggs. Examples include smoothies, ice creams, salad dressings, sauces, and poached eggs. 

The poached egg in this recipe combines beautifully with the tangy lemon juice and savory bacon fat to make a dressing that will make a salad lover out of anyone! Don’t worry, it’s lightened up with the use of center cut bacon and substituting olive oil for a portion of the bacon fat. Enjoy this summer salad guilt free as a light dinner with crusty bread or accompaniment to brunch with friends. Oh, and don’t skip the step of massaging your kale! It’s worth the extra effort, as the bitterness of the leafy green will be mellowed by the lemon juice.

  
Ingredients:

1 bunch kale, purple or green

Juice of half a lemon

Dash of salt

1 tablespoon olive oil

4 slices center cut bacon, diced

1 tablespoon thinly sliced red onion

2 tablespoons distilled white vinegar

2 large eggs

2 radishes, sliced

Freshly ground pepper, to taste

Preparation:

1. Begin by tearing the leaves from thicker stems of the kale. Discard the stems and thinly slice the leaves. Place the kale in a large mixing bowl and drizzle with lemon juice, salt, and olive oil.

2. Massage the kale for 2-3 minutes with your hands, or until it is beginning to soften.

3. Cook the diced bacon in a frying pan over medium heat, stirring occasionally until golden. Add the red onion, sauté for 60 seconds longer, and remove from heat.

4. Bring 2 quarts of water to a simmer in a saucepan. Add the white vinegar. Break an egg into a small bowl or cup and gently pour into the simmering water. Using a slotted spoon, gather the egg white around the yolk. Repeat with the second egg. Cook for about 90 seconds for runny eggs, or up to 3 minutes for firmer eggs.

5. Top the massaged kale with the warm bacon and onion mixture and toss to combine. Divide the kale between two plates or shallow bowls. Top with sliced radishes, one poached egg, and freshly ground pepper. 

  
Don’t you love that poaching eggs isn’t as difficult as it seems? I think this method is fool-proof. I hope it works for you, too! 

What are you cooking this summer? Check out the links below for more safe egg inspiration!

*By posting this recipe I am entering a recipe contest sponsored by Davidson’s Safest Choice Eggs and am eligible to win prizes associated with the contest. I was not compensated for my time. 


Salt and Vinegar Kale Chips

Ahhh!! I’m so excited about my new camera! I can’t wait to learn how to use it well! I got the Nikon D3200 because it seemed like a solid beginner DSLR at a great price. The photos in this post were shot indoors just before sunset with no diffuser or reflector, and no post-processing or filters. Not bad for my first food shoot with this camera!
IMG_0156-1.JPG
I’ve had several failed attempts at kale chips, but I think I’ve finally figured out the right way to make them! Here are some tips:

1. Use curly kale

2. Cut the leaves from the tough stalk of the kale.

3. Do not over-oil the kale (use an oil mister)

4. Do not over-crowd the baking sheet

5. Watch the kale closely as it bakes so it becomes crisp but not burned

Before:

IMG_0157.JPG
Ingredients:

1 bunch of kale
Olive oil in a mister
White vinegar in a mister (or vinegar powder, such as this one)
Finely ground sea salt

Directions:

1. Preheat oven to 350 degrees. Tear curly kale into 2″ sized pieces and scatter over a baking sheet lined with lightly greased aluminum foil. Work in batches instead of crowding the baking sheet.

2. Lightly mist the kale with olive oil and vinegar. Sprinkle with a dusting of salt.

3. Bake for 8 minutes, flip the kale leaves, and bake for several minutes more. Monitor closely- you want the kale to be crisp, but not burnt.

Enjoy the kale chips warm or allow to cool and store for a couple of days in a sealed container. Experiment with other kale chip flavors as well. Try salt + curry powder, garlic salt, grated parmesan, or simply salt + pepper as tasty alternatives! Oh, and definitely brush your teeth after eating these or you might scare people off with your green breath :)

After:

IMG_0156-1.JPG

Brown Butter Sage Spaghetti Squash

Mmmmmmm…. brown butter! Ever since I had an amazing, melt-in-your mouth pasta dish with brown butter sauce at Scarpetta a while back, I’ve been wanting to recreate something rich and buttery like it at home. Unlike me, you probably already knew that brown butter sauce is actually a breeze to make! Just heat some butter and let it caramelize. Pair the easy sauce with autumn’s best squash and you have a winning combination of indulgent and nutritious!
IMG_4577.JPG
Ingredients:

1 large spaghetti squash
3 tablespoons butter
3 sage leaves, slivered
2 garlic cloves, minced
2 tablespoons chicken stock
Salt & pepper to taste

Directions:

1. Slice the spaghetti squash lengthwise, scoop out the seeds, and place cut side down in a large glass baking dish filled with 1″ of water. Microwave for 5 minutes, followed by 2 minute intervals until the skin of the squash is tender enough to pierce with a fork. (approx. 8-10 minutes)

2. Allow the squash to cool down. Once it is cool enough to handle, scrape out the insides with a fork into a bowl. The strands should come out easily. Set aside.

3. In a large skillet, melt the butter over medium heat. Add the garlic and sage leaves. Stir around for about 1 minute until fragrant. Add the chicken stock and boil about half of it off.

4. Add spaghetti squash strands to the skillet and stir to coat with butter sauce. Season with salt and pepper.

Serve the squash as a side dish or play around with accompaniments, such as bacon or grilled chicken.

IMG_4575.JPG
Enjoy!! For a sweeter, nuttier variation, skip the garlic and add a dash of cinnamon, nutmeg, and cloves to the butter and sage sauce.

IMG_4576.JPG

By the way, I’m finally getting a nice camera to do these tasty foods justice on the blog! Stay tuned for better photos as I learn to use my Nikon D3200 :)

Sweet and Sour Cucumber Salad

This chilled recipe makes a perfect snack or appetizer on a warm day. Enjoy a refreshing cucumber in this simple salad.

20140307-063836.jpg
Ingredients:
2 medium cucumbers, thinly sliced
1 tbs shallot or red onion, minced
1/4 cup rice wine vinegar
1 tsp sesame oil
1 tsp sambal olek (hot chili paste) or 1/2 tsp red pepper flakes
1 tsp sugar, honey, or a few drops of stevia
1 tsp sesame seeds

1. Whisk together all the ingredients except cucumbers and sesame seeds in a bowl.
2. Combine sliced cucumbers with the dressing in a large bowl or ziplock bag. Toss to coat and chill in the fridge for 15 minutes.
3. Serve sprinkled with sesame seeds.

20140307-064438.jpg

Shredded Brussels Sprouts and Sausage

I got a food processor! I can’t believe I never had one before. I feel a little guilty for feeling like I needed one because we already have a Vitamix. It’s an awesome kitchen tool, though. It makes food prep a breeze. For this recipe, I was able to shred 2 pounds of raw Brussels sprouts in just two batches. The whole process of setting it up, shredding the brussels, and cleaning the machine took less than 5 minutes.

20140305-071834.jpg
The original recipe comes from PaleOMG.com; this version is a little modified. All the recipes I’ve tried by Juli have been amazing, and this one is no exception!

Ingredients:
2 lbs raw Brussels sprouts, shredded using the slicing attachment on a food processor
2 tablespoons coconut oil
1 large onion, diced
1 clove garlic, minced
4 links precooked sausage (I used artichoke mozzarella chicken sausage)
2 tablespoons apple cider vinegar
salt and pepper to taste

Directions:
1. Heat coconut oil in a dutch oven or large stockpot. Add the diced onions and cook over medium heat for about 3 minutes, until they begin to caramelize and soften. Add the garlic and cook for 30 seconds more.
2. Add the shredded Brussels sprouts, sliced sausage, and apple cider vinegar. Stir in until the brussels begin to wilt down. Cover the dutch oven or stockpot and reduce heat to low. Simmer for 15 minutes or until the brussels shreds are tender.
3. Season with salt and pepper to taste.

20140305-072810.jpg
I love that this recipe is easy to make and super flavorful thanks to the addition of sausage. Enjoy!

20140305-072909.jpg