Grilled Zucchini Naan Panini

I received free samples of Sabra Spreads mentioned in this post. By posting this recipe I am entering a recipe contest sponsored by Sabra and am eligible to win prizes associated with the contest. I was not compensated for my time.

I don’t like boring sandwiches. I pack my lunch to work most days, but I rarely ever pack sandwiches because they’re either too plain or too soggy. When I do eat a sandwich, it’s typically a grilled panini with flavorful toppings. Sabra has re-ignited my love of panini sandwiches with their flavorful new spreads!

dsc_0026

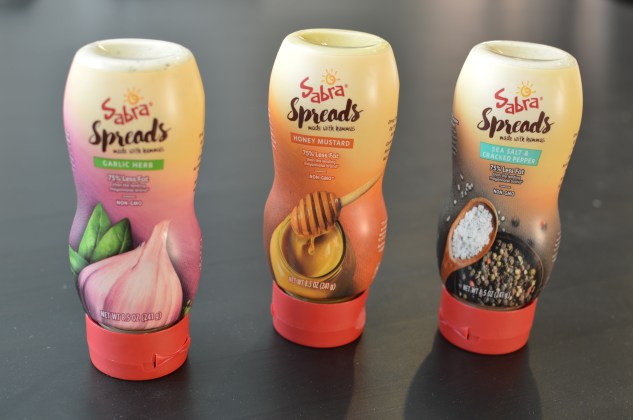
Sabra’s zesty spreads bring life to otherwise boring sandwiches. These healthy spreads will be my go-to sandwich topping in place of mayonnaise. They have 75% less fat and waaaay more flavor than plain ol’ mayo.

The flavorful blend of garlic, basil, chives, and oregano in the Garlic Herb Spread inspired me to create a dairy-free panini sandwich! If you happen to be lactose intolerant, you won’t even miss the cheese.

dsc_0021

Grilled Zucchini Naan Panini

  • Servings: 1
  • Difficulty: easy
  • Print

A zesty dairy free grilled sandwich with garlic herb hummus spread.

Ingredients

  • 1/2 zucchini, sliced lengthwise into 1/4″ thick strips
  • Olive oil
  • 1 large naan bread
  • 2 tablespoons Sabra Garlic Herb Spread
  • 1 roasted red bell pepper, cut into strips
  • 2 oz shredded cooked chicken

Directions

  1. Heat a grill pan over medium heat. Brush olive oil onto one side of zucchini strips. Place them oil side down on the hot grill pan and brush olive oil on the top side as well. Carefully flip after about 2 minutes, or when grill marks form. Grill for 2 more minutes and set aside.
  2. Cut the naan bread in half, place bumpy side down, and spread 1 tablespoon of Sabra Garlic Herb Spread on each flat half.
  3. Layer roasted red pepper strips, shredded chicken, and grilled zucchini on one of the naan bread halves. Top with the other naan bread half.
  4. Brush the grill pan with olive oil and carefully transfer the sandwich onto the grill pan for 2 minutes. Brush olive oil on top of the sandwich and carefully turn it over using tongs. Grill for 2 more minutes.
  5. Remove from the grill pan using tongs, cut in half, and serve immediately

My husband, who prefers a cheesy quesadilla for dinner most nights, agreed that this sandwich is delicious and he didn’t even miss the cheese! Of course, a little bit of crumbled feta on here would be heavenly. Have you tread the Sabra Spreads? What do you think?

Check out the posts in the Recipe ReDux linkup below for more sandwich inspiration!


Grown Up Macaroni and Cheese

This month’s Recipe Redux theme is “First Cooking Recollections.” I’m excited to share a little of my cooking background with you, especially now that I’m getting geared up to teach some basic cooking skills classes to my patients at work! I believe that kids are more likely to become interested and proficient in cooking healthy, delicious meals if they get started at a young age.

I’ve been cooking since I was four or five years old. Back then, my dad would pay me $5 to make him dinner. Dinner, in this case, was a couple of slices of Wonder bread topped with ketchup, shredded cheese, and pepperoni microwaved until hot and soggy for 60 seconds! I was so proud of myself.

When I was a little older, I learned to scramble eggs and cook quesadillas in a pan. When I was 12 or so, I started writing down my grandmother’s Polish recipes and learning some more sophisticated cooking techniques. She showed me how to tenderize chicken, chop vegetables without cutting my fingers off, and knead pierogi dough.

You’d think that by high school I must have been whipping up gourmet foods. In reality, I was too busy with school and IM-ing my friends to be bothered by cooking complex meals. I usually baked boxed cake mixes and enhanced cans of Spaghetti-O’s with cheese and tuna. To be honest, some of my favorite meals these days are the ones that take the least time and effort to prepare!

As a dietitian, I don’t feel great about eating a box of mac & cheese for dinner, but I can justify it if I add some protein and greens! My favorite combos lately have been sharp cheddar mac + broccoli + cherry tomatoes + chicken breast and the recipe I’m sharing with you today.

dsc_0003

Grown Up Mac & Cheese

  • Servings: 2
  • Difficulty: easy
  • Print

A healthier take on a childhood classic.

Ingredients

  • 1 box mac & cheese, such as Aunt Annie’s Aged Cheddar Macaroni & Cheese
  • 3 tablespoons low fat milk
  • 1 cup chopped frozen spinach, thawed
  • 4 oz cooked shredded chicken breast
  • 1/2 cup marinara sauce

Directions

  1. Prepare boxed macaroni and cheese according to package directions. Keep the macaroni with cheese sauce in the saucepan.
  2. Stir in the spinach, chicken, and marinara sauce.
  3. Heat and stir until all ingredients are hot and well combined.

dsc_0001

This week I’m teaching the kids some knife skills. We’re starting easy by cutting bananas, avocados, and zucchini using nylon chef’s knives. If you want to get your kids into cooking, here’s a great blog post with tips.  I love the idea of using a lettuce knife and Play Doh to start! This handbook from Cooking Matters gives some great insight for starting a hands on cooking program in your area! If you’re at a point where you’re still learning, Williams & Sonoma offers reasonably priced cooking classes for kids and adults. Recent topics covered were spiralizer recipes, Fall baking, barista basics, and Labor Day BBQ. Colby and I are taking a knife skills class these this weekend! I’ve heard is worth well over the $10 we’re paying to attend :)

The Recipe ReDux is the first and only recipe challenge founded by registered dietitians. The group is focused on taking delicious dishes, keeping them delicious, but making them better for you. 

Check out the link below to see how some of my fellow RDs and healthy foodies got their start in the kitchen!

Blackened Fish Tacos with Kiwi Mojito Salsa

I received free samples of Zespri SunGold Kiwifruit mentioned in this post. By posting this recipe I am entering a recipe contest sponsored by Zespri Kiwifruit and am eligible to win prizes associated with the contest. I was not compensated for my time.

The first thing I thought when I saw a kiwifruit without fuzzy skin and yellow flesh was, wow, this genetically engineered fruit is so cool, but will people be put off by the GMO’s? But then I was surprised to discover that Zespri SunGold kiwifruit is non-GMO! So how does it get its tropical flavor, high amount of vitamin C, and smooth skin? This surprising and delightful new fruit is a natural cross between gold varieties of kiwifruit. Kiwifruit actually comes in other colors, too, ranging from green to yellow and even pink on the inside!

You can find juicy yellow SunGolds at your local grocery store in North America from May-October.

Want to know some more cool facts about kiwifruit? Here you go!

1. You don’t peel it!

• Kiwifruit is the perfect portable snack because it is easy to eat! Just cut in half with a knife and scoop with a spoon. That’s it – just cut, scoop, and enjoy!

2. It’s a good, natural meat tenderizer!

• Both green and SunGold kiwifruit contain an enzyme called actinidin that helps break down protein. Actinidin occurs only in kiwifruit and improves digestive comfort by increasing the breakdown of proteins and facilitating digestion and emptying of the stomach. The actinidin can serve as a meat tenderizer: just peel and mash a kiwifruit and spread over meat or make a kiwifruit marinade. Actinidin will also break down protein in dairy so recipes with dairy should be consumed right away.

3. It’s a tasty source of vitamins C & E as well as potassium!

• One serving (2 kiwifruit) of SunGold provides three times more vitamin C than an orange and as much potassium as a medium banana. SunGold is a good source of antioxidant vitamin E.

4. You can “measure” the sweetness of kiwifruit!

• Zespri growers achieve the best-tasting kiwifruit through a measure called the brix. The higher the brix, the sweeter the fruit. The dry matter content (where all water is removed) indicates how high the brix will be once the fruit is ripe. A higher dry matter means the better quality the kiwifruit will be- it stores better and tastes better. Zespri kiwifruit is deliciously sweet, since the growers put a lot of emphasis on this measure.

There are many creative ways to use kiwifruit in cooking. You can marinate meat in it, put it in a cocktail, or make a refreshing summer ceviche. Here it is in a sweet and spicy take on fish tacos.

DSC_0006

Blackened Fish Tacos with Kiwi Mojito Salsa

  • Servings: 4
  • Print

A sweet and spicy take on fish tacos for hot summer nights.

Ingredients

  • 2 SunGold kiwifruit, halved, scooped out of skin, and diced
  • 1 jalapeño pepper, seeded and finely chopped
  • 2 tablespoons diced red cabbage
  • 1 tablespoon chopped fresh mint
  • 1 tablespoon chopped fresh cilantro
  • 2 tablespoons fresh lime juice
  • 2 tablespoons taco seasoning OR:
  • – 1 teaspoon paprika – 1 teaspoon brown sugar – 1 teaspoon dried oregano – 3/4 teaspoon garlic powder – 1/2 teaspoon chili powder – 1/2 teaspoon salt – 1/2 teaspoon ground cumin – 1/4 teaspoon ground cayenne pepper
  • 1 1/2 pounds tilapia filets
  • 1 tablespoon canola oil
  • 8 corn tortillas
  • Sriracha sauce, lime wedges, and/or sour cream for garnish

Directions

  1. In a medium bowl, toss together kiwifruit, jalapeño, cabbage, mint, cilantro, and lime juice. Set aside.
  2. If not using premade taco seasoning, combine the paprika, brown sugar, oregano, garlic, chili powder, salt, cumin, and cayenne in a small bowl to make your own. Sprinkle seasoning over the tilapia filets.
  3. Heat the canola oil in a large cast iron pan over high heat. Once very hot, cook the tilapia filets in it for about 3 minutes per side, or until blackened and cooked through. The fish should flake easily with a fork.
  4. Carefully heat the corn tortillas directly over the flame of a gas range to char them, or simply warm in an un-greased pan over medium-high heat.
  5. Divide the fish and salsa evenly among the tortillas. Garnish as desired and serve immediately.

DSC_0002

There’s nothing quite like summer eating, right? Let me know what you think of these tacos and be sure to check out culinary creations submitted by other Recipe ReDux members below:

Spicy Pork Tenderloin Salad

This spicy pork tenderloin salad is served with seared tomatoes and a creamy harissa yogurt dressing. Enjoy it with a glass of riesling!

Spicy Pork Tenderloin Salad with Harissa Yogurt Dressing

Spicy Pork Tenderloin Salad with Harissa Yogurt Dressing

  • Servings: 4
  • Print

A flavorful entree salad that won't weigh you down on hot summer days! Delicious with a glass of chilled riesling.

Adapted from: cookinglight.com

Ingredients

  • 1 roasted red bell pepper, jarred
  • 3 tablespoons olive oil, divided
  • 3 tablespoons lemon juice, divided
  • 1 tablespoon sambal oelek (ground fresh chile paste)
  • 3/4 teaspoon kosher salt, divided
  • 1 1/2 teaspoons ground cumin, divided
  • 1/4 teaspoon ground coriander
  • 2  garlic cloves
  • 1 cup plain 2% reduced-fat Greek yogurt
  • 1/4 cup chopped fresh mint
  • 1  (1-pound) pork tenderloin, trimmed
  • 2 roma tomatoes, sliced into 1/4″ thick disks
  • 8 cups mixed greens
  • Freshly ground black pepper

Directions

  1. Place bell pepper, 2 tablespoons olive oil, 2 tablespoons juice, sambal oelek, 1/4 teaspoon salt, 1/2 teaspoon cumin, coriander, and garlic in a food processor; process until smooth. Place half the harissa in a large bowl and set aside. Place the remaining harissa in a microwave safe dish and cook, covered, in the microwave for 60 seconds. Stir and set aside to cool.
  2. Preheat oven to 425°.
  3. Combine yogurt, mint, 1 tablespoon juice, and 1 teaspoon cumin in a bowl.
  4. Heat a large skillet over medium-high heat. Add 1 tablespoon olive oil; swirl to coat. Sprinkle pork with 1/2 teaspoon salt. Add pork to pan; cook 6 minutes, browning on all sides. Add pork to harissa in the large bowl, turning to coat. Sear tomato slices in the hot pan for 60 seconds each side. Remove from heat.
  5. Place pork on a rack in a pan; brush with remaining harissa from the large bowl. Bake at 425° for 11 minutes or until a thermometer registers 145°. Remove from oven; let stand 5 minutes; cut crosswise into 12 slices. Serve 3 slices over 2 cups of mixed greens with tomato slices, a drizzle of microwaved harissa, and a dollop of yogurt sauce.

This recipe is an adaptation of one of Colby’s favorite meals of all time, North African Pork Tenderloin. He has enjoyed other variations of pork tenderloin that I’ve made, but this remains his top pick.

Spicy Pork Tenderloin Salad

If you like riesling wine, you’ve gotta try this one! One of my sister’s favorites, Kingfu Girl, is sweet, crisp, and reasonably priced at Trader Joes! It pairs perfectly with the spiciness of the pork tenderloin in this salad.

Kung Fu Girl Riesling

Skinny Mini Calzones

This month’s Recipe ReDux theme is “Small Bites” and I’ve been craving pizza, so here’s a fun twist for you to try! My sister and I used to love snacking on Pizza Rolls and 3D Doritos (remember those??) when we were kids. These  mini calzones are like the adult version of Pizza Rolls. Kids would probably love them too, of course!

IMG_0593

Skinny Mini Calzones

  • Servings: 8 palm-sized calzones
  • Print

Ingredients

1 lb pizza dough (homemade or store bought. I’m partial to the Trader Joe’s Herb dough!)

1 teaspoon olive oil

1/4 cup finely diced onion

1/3 cup diced mushrooms

1/3 cup chopped spinach, frozen

6 ounces light mozzarella cheese, shredded

2 ounces salami, diced

1 tablespoon fresh chopped basil

Flour, for rolling the dough

1 egg white, in a small bowl

1 cup marinara sauce


Directions

  • Set the pizza dough out on the counter to rise for 30 minutes. Preheat the oven to 400 degrees.
  • Heat the olive oil in a medium nonstick skillet over high heat. Sauté the onion for about 1 minute, until beginning to caramelize. Add the mushrooms and chopped spinach. Sauté for 1 minute more. Set aside.
  • Make the filling by stirring together the cheese, sautéed veggies, salami, and fresh basil in a bowl.
  • Cut the dough into eight 2-oz pieces. Work with one piece at a time: Make a ball our of the dough piece and set on a lightly floured surface. Press the ball into a disk and roll out into a 6-inch circle about 1/8 inch thick. Scoop a large spoonful (about 1/4 cup) of filling onto one half of the circle. Fold it over to form a half-moon shape and press the edges to seal it. Place the calzone on a baking sheet lined with parchment paper. Crimp the edges with a fork and brush with egg white. Repeat with the remaining dough pieces.
  • Bake for 15-20 minutes, or until golden brown. Serve with warm marinara sauce for dipping.


Each dough ball should look like this:

IMG_0604

And then you fill it like this:

IMG_0603

This is how they should look before they’re baked:

IMG_0602

Once they’re fresh out of the oven,  you can enjoy these cute little calzones with marinara sauce!

IMG_0592


As always, check out other Recipe ReDux posts below!

Chicken Lettuce Wraps

src=”https://rdkarolina.files.wordpress.com/2016/04/img_0573.jpg” alt=”IMG_0573″ width=”4000″ height=”6016″

Do you pack a lunch to work or school? It saves me a lot of money to pack food for myself and Colby each morning. My typical go-to packed snacks are:

-Asian salad: shredded cabbage, spinach, grated carrots, wonton crisps, rotisserie chicken, and sesame soy ginger dressing

-Greek yogurt parfait: plain nonfat Greek yogurt, stevia, frozen mixed berries, and granola cereal

(Actually, that’s been about it lately!)

I love this month’s Recipe ReDux theme because it got me thinking of ways I can branch out and try some new packed lunch ideas. I’m lucky to have a fridge and microwave at work, so almost any meal works for me. If you don’t have that luxury, this meal tastes great chilled! You can pack the seasoned turkey filling in a plastic container, lettuce in a zip top bag, and pack it all in a lunchbox with an ice pack!

I tried making a shortcut tuna fish version of this. Let’s just say that recipe is still a work in progress ;) This version is good to go! I’m happy with the addition of chopped spinach and grated carrots. You get some extra veggies and flavor that way!

IMG_0574

Chicken Lettuce Wraps

  • Servings: 4
  • Difficulty: easy
  • Print

Ingredients:

1 lb ground chicken (or turkey)

1 cup frozen chopped spinach, broken up a bit

1/2 cup grated carrots

1 can water chestnuts, drained and diced

2 tablespoons hoisin sauce (if you choose one with more than 300 mg sodium per serving, skip the garlic salt)

1/2 teaspoon garlic salt

1 teaspoon reduced sodium soy sauce

1 teaspoon rice vinegar

3 tablespoons powdered peanut butter

2 tablespoons chopped green onion

Sriracha sauce (optional)

head of butter lettuce

Preparation: 

  1. Cook the ground chicken (or turkey) in a large nonstick skillet over medium-high heat, breaking up the chunks with a spatula and stirring frequently until no longer pink. This should take about 5 minutes.
  2. Add the chopped spinach, grated carrots, and diced water chestnuts. Continue to stir and heat until everything is hot and bubbling, about 2-3 minutes.
  3. Add the remaining seasonings (hoisin sauce through green onion), and continue to stir to combine the flavors for another 1-2 minutes.
  4. Scoop into leaves of butter lettuce and drizzle with sriracha sauce if you like it spicier!


IMG_0577

I’m looking forward to getting back in the kitchen to develop more recipes. Colby has pointed out that the dinners I’ve been making have been “weak” lately. It’s true! We’ve been dining on easy meals, like quesadillas, quick pastas, smoothies, and protein shakes. Challenge accepted- I will make more fast and easy recipes that are a little more imaginative. Can’t wait to share them with you all too :)

Check out more lunch ideas in this month’s Recipe ReDux linkup below!

Easy Zucchini Noodle Ramen Pasta

Thanks, Recipe ReDux, for reminding me that it’s tax season and I have yet to file our return! The past few weeks have been crazy busy, so this month’s ReDux theme of “seven ingredients or less” is much appreciated. You too can have dinner ready in under 10 minutes with this breeze of a meal!

IMG_0548

Ingredients:

(serves 1)

1 block of brown rice ramen noodles (found them at Costco)

1 teaspoon olive oil

1/4 cup red onion, sliced

3 oz cooked chicken breast, shredded

1  jarred roasted red pepper, sliced into thin strips

1 teaspoon chicken bullion paste

1 large zucchini, cut into long strands

Preparation:

  1. Cook the ramen noodles according to package instructions, boiling for about 4 minutes in a small saucepan.
  2. While the noodles cook, heat the olive oil in a skillet. Sauté the red onion, chicken, and red pepper for 2 minutes.
  3. Stir in the bullion paste, hot drained ramen noodles, and zucchini strands. Serve immediately.

IMG_0546

This dish is fast, nutritious, and tastes like a guilty pleasure! By bulking up the ramen with zucchini noodles you can enjoy a heaping bowl of comfort food and feel great about your decision.

450 calories/ 59 grams carb/ 9 grams fat/ 31 grams protein/ 7 grams fiber

IMG_0547


Turkey Stuffed Acorn Squash

This recipe tastes like Thanksgiving. It’s February, but that’s ok! In fact, I’ll be roasting our Thanksgiving turkey this month. I read in Cooking Light Magazine that carving the turkey first and then roasting the individual pieces yields better results. I’ll be sure to share how it turns out!

In the meantime, make this tasty dish that’s hearty and flavorful!

3B76020D-E3DB-4C31-B15B-BABF139A0E9F

Ingredients:

(Makes two halves, 4 servings)

1 acorn squash, cut horizontally and seeds removed

Cooking Spray

1 lb lean ground turkey

1 tablespoon olive oil

1 cup diced celery

1 cup diced onion

2 cloves garlic, minced

1/4 cup diced cranberries

1 tablespoon chicken broth concentrate (or 1 bouillon cube dissolved in 1 tablespoon boiling water)

1 teaspoon dried sage

1 teaspoon dried thyme

Freshly ground pepper

B7F659DF-76D4-4D53-9427-BF365BB8C12C

Preparation:

  1. Roast the acorn squash cut side down on an aluminum foil lined baking sheet sprayed with cooking spray at 375 degrees for 45 minutes, or until tender.
  2. 10 minutes before the squash is done, brown the ground turkey in a 10″ nonstick skillet. Do not drain. Transfer the turkey and any liquid to a separate bowl.
  3. Heat 1 tablespoon olive oil in the 10″ skillet over medium-high heat. Add the celery and onion. Sauté until the onion begins to turn translucent, about 5 minutes. Add the garlic and cranberries. Sauté 1 minute longer, until fragrant. Add the turkey back in, along with the bouillon paste.
  4. Season with sage and thyme. Transfer the meat and vegetable mixture into the acorn squash halves and serve hot, topped with freshly ground black pepper.
  5. If you have leftovers, you can scoop out the acorn squash into a storage container and stir together with the meat filling to make a tasty squash hash.

F7E8AF0E-0EB8-4C1D-BD7F-E49873E80D9E

The concentrated chicken broth really brings out the flavor in this dish. I hope you enjoy it as much as I did!

Moroccan Chicken Tagine over Kamut

Bored of the same old flavors when eating clean? Try this bold dish to excite your taste buds! This month’s Recipe ReDux theme is using new ingredients. My recipe features THREE new (to me) ingredients/ tools.

Tagine (tajine)- This is an earthenware pot in which the North African dish by the same name is cooked. Traditionally, this clay pot is placed over hot coals and is used in a cooking method similar to roasting. In this recipe, I place the tagine in the oven. The cone shaped lid helps any condensation that forms return to the bottom. A similar result can be achieved by using a slow cooker!

  
Raz el Hanout- This is a spice mix used in North African (typically Moroccan) dishes. It means “head of the shop” (or top shelf), referring to the best spices the seller has to offer. It is traditionally rubbed on meat or stirred into couscous or rice in savory dishes. The blend that my sister found at World Market is made of ginger, pepper, nutmeg, cinnamon, allspice, cayenne, and… “other spices”?? These are most likely cardamom, cumin, and/or coriander. Big, bold flavors here!


Kamut (khorasan wheat)- Traditional Moroccan tagine is served over couscous or plain white rice, but I decided to try out a different whole grain to shake things up a bit. This ancient grain is rich in protein, fiber, B vitamins, and manganese (an essential mineral). Half a cup of cooked kamut has only 140 calories and 6 grams of protein- that’s about 40% more than wheat! Kamut is not gluten free. Its flavor is slightly sweet, nutty, and buttery. The texture is pleasantly chewy with a bit of a bite. I’ll be trying it in a salad next time!

  
Ready? Here comes the recipe for a delicious dish bursting with flavor! If you’re eating healthy and ready to try something new, this is the meal for you!

  
Ingredients:

2 large chicken breasts

1 teaspoon raz el hanout

2 teaspoons honey

2 garlic cloves, minced

pinch of dried chili flakes

4 tablespoons olive oil

1 tablespoon lemon juice

1 tablespoon salt

3 cups boiling water

1 cup kamut

1 large onion, thinly sliced

1 3/4 cups vegetable stock

15 oz can garbanzo beans, drained and rinsed

1 1/2 cups grape or cherry tomatoes, sliced lengthwise

1/4 cup pitted green olives

Fresh chopped cilantro (optional)

Preparation:

  1. Pound the chicken breasts with a mallet on a cutting board to 1″ thick. Cut each breast into 4 chunks.
  2. Whisk together raz el hanout, honey, garlic, chili flakes, olive oil, lemon juice, and salt in a glass dish. Place the chicken breasts in the mixture, coat well, cover, and refrigerate 8-12 hours.
  3. Combine Kamut and boiling water in a saucepan. Simmer on low heat, covered, for 1 hour. If using a slow cooker, do this step about an hour before serving the meal.
  4. If using a tagine, preheat the oven to 350 degrees. While the kamut cooks, pan fry the marinated chicken breasts over medium-high heat until golden on all sides. Transfer the browned chicken and remaining marinade into the tagine or slow cooker.
  5. Top the chicken with onions, vegetable stock, garbanzo beans, tomatoes, and olives. If using a tagine, cover and cook in the oven for 1 hour until the chicken is tender and cooked to an internal temperature of 165 degrees F. If using a slow cooker, cover and cook on high for 4 hours or low for 8 hours.
  6. Serve over cooked kamut topped with fresh cilantro, salt, and pepper.

  
The flavors in this dish are vibrant an unique! I’m looking forward to trying other dishes cooked in the tagine. Check out the links below for other recipes developed by the Recipe ReDux crew!