Ukrainian Beet Soup (Borscht)

My grandmother is an excellent cook. She lives in Poland, but whenever I talk to her on the phone or Skype, she tells me about her latest recipe creations. She would be an excellent healthy food blogger because she has a knack for transforming typically high calorie dishes into light yet flavorful meals. I only lived in Poland for about 7 years of my life, but my sister and I traveled back to visit almost every summer through middle school and high school. She made us countless delicious meals, including Polish classics like pierogi, hunter’s stew, leniwe kopytka (potato and cheese dumplings), surowki (vinaigrette dressed coleslaws), kotlety schabowe (thinly pounded and breaded pork tenderloin), and kotlety mielone (a cross between hamburger and meatloaf), tomato soup, and Ukranian borscht. One summer, when I was 12, I decided to write down her recipes for my favorite classics. It was very challenging since she never measures anything! I’d ask how much flour she was using, for example, and she would say “a glassful.” Whenever she seasoned something it was with “a good amount” or a “heaping spoonful.” Back then I was all about precision, so it was frustrating to guesstimate how much of everything she was using. Now that I’m older and cook more often, I can relate to her way of doing things. It’s actually pretty tricky to blog recipes for me because my inclination is to eyeball measurements rather than busting out the measuring cups and spoons.

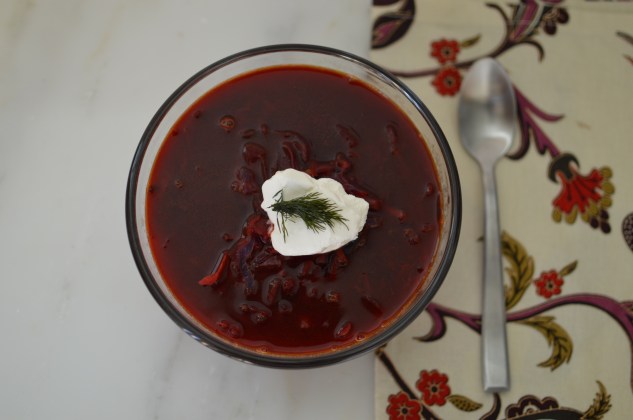
In spite of this tendency, here is a precisely measured recipe for one of my childhood favorites, Ukrainian Beet Soup! It’s packed full of veggies and so incredibly flavorful. The rye-bread taste of caraway seeds really stands out in this soup.

Ukranian Borsht

Ukrainian Beet Soup

  • Servings: 4-6
  • Print

A hearty vegetarian soup bursting with delicious caraway seed flavor

Adapted from my grandmother’s recipe

Ingredients

  • 1 large potato, thinly sliced
  • 1 large beet, thinly sliced
  • 4 cups vegetable stock (can sub beef or chicken stock)
  • 1 tablespoon butter
  • 1 tablespoon olive oil
  • 1 large onion, chopped
  • 1 celery stalk, chopped
  • 1 large carrot, sliced
  • 1 teaspoon caraway seeds
  • 2 teaspoons salt
  • 1/2 head red cabbage, chopped
  • 1 tablespoon apple cider vinegar
  • 1 cup tomato sauce
  • 1 teaspoon fresh dill weed, chopped
  • black pepper, to taste
  • sour cream and fresh dill for topping

Directions

    1. Cook sliced potatoes and beets in stock in a 2 gallon stockpot until vegetables are fork tender, about 20 minutes. Strain the stock into a large bowl by pouring everything through a strainer. Set the potatoes and beets aside and keep the stock.
  1. Melt the butter and olive oil in the stockpot over medium-high heat. Stir in the onions, celery, carrots, caraway seeds, and salt. Cook down for 3-5 minutes, or until the onions begin to turn translucent. Add the cabbage and pour in the reserved stock. Covered, reduce heat to medium, and cook for about 10 minutes until all vegetables are tender.
  2. Add the potatoes and beets back into the stockpot. Stir in vinegar, tomato sauce, and dill. Season with black pepper to adjust the taste to your liking. Cover, reduce heat to low, and simmer for another 30 minutes. Serve topped with sour cream and fresh dill.

This is seriously one of my favorite soups of all time! Even if you don’t love beets, give it a try. It’s a wonderful way to use the sweet root vegetable in a seriously savory dish.

Beet Soup

Creamy Vegan Risotto

I received free samples of Progresso Cooking Stock mentioned in this post at no cost. By posting this recipe I am entering a recipe contest sponsored by Progresso Cooking Stock and am eligible to win prizes associated with the contest. I was not compensated for my time.

Risotto has always been an intimidating dish to me. I always assumed it takes a lot of culinary skill to make it properly. In fact, my first attempt at making risotto in the oven failed miserably. Fortunately, my sister is a chef and she took the time to show me the right way to make it. Turns out it’s not very difficult or time consuming! The most important thing is to pay attention to the rice to keep it from getting overcooked and gluey.

Agata taught me to make a very creamy risotto with parmesan and mascarpone. It was incredibly delicious!! For this Recipe Redux challenge, I decided to make a risotto that is just as creamy without the addition of cheese. I’m so excited to show you that it’s possible to make a flavorful, creamy risotto dish that is completely vegan! Thanks to Progresso’s Vegetable Cooking Stock, you get depth of savory flavor without animal products. The #ProgressoEatsContest gave me the opportunity to experiment a bit.

In case you didn’t know that Progresso launched a line of tasty cooking stocks, here are some details about the products:

  • Now available in grocery stores nationwide in the soup aisle, Progresso premium Cooking Stocks are made by simmering real bones, vegetables and herbs to create a flavor that’s close to homemade.
  • Due to the process Progresso’s chefs use to simmer the real bones, Progresso Cooking Stocks have rich, meaty flavor and are full of body, making them ideal for adding deep, complex flavor to many dishes including soups, stews, sauces and gravies.
  • Made without artificial flavors and with just 15-45 calories /95-420mg sodium /0-1g fat per serving, Progresso Stocks offers a clean way to boost your flavor game.

I used the chicken stock to make a delicious soup, but was even more impressed with the depth of flavor imparted by the hearty vegetable stock. It really shines through in this recipe!

IMG_0455

Ingredients:

(Serves 3-4)

2 tablespoons olive oil

1/2 cup diced yellow onion

1 clove minced garlic

3/4 cup arborio rice

1/3 cup dry white wine

3 cups simmering Progresso Vegetable Cooking Stock

1/2 cup diced mushrooms

1/2 cup frozen peas

salt and freshly ground pepper

Preparation:

  1. Heat olive oil in a medium nonstick saucepan over medium-high heat. Add the diced onion and stir constantly until softened and translucent, about 3 minutes.
  2. Add the minced garlic and arborio rice to the saucepan. Stir constantly to coat with olive oil and toast, another 3 minutes.
  3. Add the white wine and stir until the liquid is absorbed and some of the alcohol has cooked off, another 2-3 minutes.
  4. Add enough vegetable stock to just cover the rice. Stir constantly until most of the liquid is absorbed. Add another 1/2 cup of stock to the rice. Repeat this process of adding the stock gradually and stirring frequently until the rice is cooked al dente. Do not overcook! The process of adding the stock 1/2 cup at a time should take about 15-20 minutes over medium-high heat.
  5. Fold in mushrooms and frozen peas. Stir for about 2 minutes until the vegetables are heated through. Season to taste with salt and freshly ground pepper.

The whole process takes less than 45 minutes and is well worth the effort! This risotto is creamy like mac n’ cheese and maintains a nice texture from the al dente cooked rice and pop of the green peas. Enjoy!

IMG_0459

Curried Lentil Soup


Hello! This is my first month participating the the Recipe Redux! This month’s theme is “spooky spices.” This recipe for curried lentil soup fits the theme because it uses several spices that I pulled out from waaaaay back in my pantry because I’m rarely brave enough to use them. Well, this soup turned out so well, I’ll have to incorporate Turmeric and Calcutta Heat into my cooking more often!

Calcutta Heat

Sometimes I cook a dish just because I have leftovers. In this case I had a little bit of chicken stock base left after making garlic butter shrimp for my husband and client. I don’t like shrimp, so I made myself a different dish on a whim. I had almost everything on hand to make this lentil soup by The Traveler’s Lunchbox. The only thing missing was cardamom, which is a fairly expensive spice that Colby and I buy EVERY year to make his German mulled wine for Christmas. It’s called feuerzangenbowle and I’ll be sure to post his signature recipe for it as the holidays approach. It involves lighting sugar and rum on fire, so it’s lots of fun to make! Anyway, we’ve bought cardamom at least twice before, yet it’s nowhere to be found in the pantry… so I improvised with spicy curry powder! The kind I use is called Calcutta Heat, which is a spicy curry blend. I suspected that the lentil soup would be strangely sweet (with nutmeg, cinnamon, and cloves), I don’t like my entrees overly sweet. Without the cardamom, the soup was missing something, so swapping in Calcutta Heat actually enhanced the soup. Try it out! It’s incredibly flavorful and warming for a chilly day.
Curried Lentil Soup

Ingredients (serves 2):

1/2 cup dry lentils
2 cups chicken stock
1 sprig fresh thyme
1/2 teaspoon turmeric
1 tablespoon butter
1/4 large onion, diced
2 cloves garlic, minced
1/2 teaspoon Calcutta Heat or curry powder & cayenne pepper
Pinch of each: nutmeg, cinnamon, ground cloves
1/4 – 1/2 cup coconut milk (depending on how creamy you like your soup- I opted for 1/4 cup)
Large handful of fresh spinach, sliced
Salt and pepper to taste

Directions:

1. Combine lentils, chicken stock, thyme, and turmeric in a small/ medium saucepan. Bring to a boil and reduce to a simmer for about 20 minutes, or until the lentils are tender. Discard the spring of thyme.

2. While the lentils are cooking, heat butter in a skillet over medium heat. When melted, add onions and stir around until tender and golden (about 2-3 minutes). Add fresh garlic, curry powder of choice, nutmeg, cinnamon, and ground cloves. Stir around until fragrant.

3. Scrape the onions and seasonings into the saucepan (if you want to get every last bit, like me, add the lentils and stock to the skillet instead). Add the coconut milk and fresh spinach.

4. Reduce the heat and simmer for about 10 more minutes. Adjust the flavor to your liking with salt and pepper. Serve hot.

Check out other Recipe ReDux recipes below!


Salt and Vinegar Kale Chips

Ahhh!! I’m so excited about my new camera! I can’t wait to learn how to use it well! I got the Nikon D3200 because it seemed like a solid beginner DSLR at a great price. The photos in this post were shot indoors just before sunset with no diffuser or reflector, and no post-processing or filters. Not bad for my first food shoot with this camera!
IMG_0156-1.JPG
I’ve had several failed attempts at kale chips, but I think I’ve finally figured out the right way to make them! Here are some tips:

1. Use curly kale

2. Cut the leaves from the tough stalk of the kale.

3. Do not over-oil the kale (use an oil mister)

4. Do not over-crowd the baking sheet

5. Watch the kale closely as it bakes so it becomes crisp but not burned

Before:

IMG_0157.JPG
Ingredients:

1 bunch of kale
Olive oil in a mister
White vinegar in a mister (or vinegar powder, such as this one)
Finely ground sea salt

Directions:

1. Preheat oven to 350 degrees. Tear curly kale into 2″ sized pieces and scatter over a baking sheet lined with lightly greased aluminum foil. Work in batches instead of crowding the baking sheet.

2. Lightly mist the kale with olive oil and vinegar. Sprinkle with a dusting of salt.

3. Bake for 8 minutes, flip the kale leaves, and bake for several minutes more. Monitor closely- you want the kale to be crisp, but not burnt.

Enjoy the kale chips warm or allow to cool and store for a couple of days in a sealed container. Experiment with other kale chip flavors as well. Try salt + curry powder, garlic salt, grated parmesan, or simply salt + pepper as tasty alternatives! Oh, and definitely brush your teeth after eating these or you might scare people off with your green breath :)

After:

IMG_0156-1.JPG

Brown Butter Sage Spaghetti Squash

Mmmmmmm…. brown butter! Ever since I had an amazing, melt-in-your mouth pasta dish with brown butter sauce at Scarpetta a while back, I’ve been wanting to recreate something rich and buttery like it at home. Unlike me, you probably already knew that brown butter sauce is actually a breeze to make! Just heat some butter and let it caramelize. Pair the easy sauce with autumn’s best squash and you have a winning combination of indulgent and nutritious!
IMG_4577.JPG
Ingredients:

1 large spaghetti squash
3 tablespoons butter
3 sage leaves, slivered
2 garlic cloves, minced
2 tablespoons chicken stock
Salt & pepper to taste

Directions:

1. Slice the spaghetti squash lengthwise, scoop out the seeds, and place cut side down in a large glass baking dish filled with 1″ of water. Microwave for 5 minutes, followed by 2 minute intervals until the skin of the squash is tender enough to pierce with a fork. (approx. 8-10 minutes)

2. Allow the squash to cool down. Once it is cool enough to handle, scrape out the insides with a fork into a bowl. The strands should come out easily. Set aside.

3. In a large skillet, melt the butter over medium heat. Add the garlic and sage leaves. Stir around for about 1 minute until fragrant. Add the chicken stock and boil about half of it off.

4. Add spaghetti squash strands to the skillet and stir to coat with butter sauce. Season with salt and pepper.

Serve the squash as a side dish or play around with accompaniments, such as bacon or grilled chicken.

IMG_4575.JPG
Enjoy!! For a sweeter, nuttier variation, skip the garlic and add a dash of cinnamon, nutmeg, and cloves to the butter and sage sauce.

IMG_4576.JPG

By the way, I’m finally getting a nice camera to do these tasty foods justice on the blog! Stay tuned for better photos as I learn to use my Nikon D3200 :)

Balsamic Roasted Brussels Sprouts

Hey there! Colby and I moved into our first home! I’ll have to show you a photo tour soon. It’s been a lot of fun getting everything set up, but it’s been taking up all my free time. Just before we moved, I made a massive batch of Brussels sprouts to snack on throughout the week. The recipe is easy and delicious- it’ll make Brussels sprouts your new favorite vegetable.

20140129-205059.jpg
Ingredients:
-2 lbs trimmed Brussels sprouts
-1/3 cup olive oil in a spray bottle (such as Misto)
-2 tbs balsamic vinegar
-Salt and pepper to taste

Directions:
1. Preheat oven to 450 or 500 degrees (depending on how charred you like your veggies). Slice Brussels sprouts in half lengthwise and place cut side up on a lightly greased baking sheet in a single layer. Use an extra baking sheet if necessary.
2. Spray the sprouts generously with olive oil and sprinkle with salt. Bake for 8 minutes.
3. Flip the sprouts over cut side down, spray with olive oil again, and bake for another 8 minutes.
4. Flip one more time and bake 5-10 minutes more or until golden and tender.
5. Transfer the sprouts to a mixing bowl and toss with freshly ground pepper and balsamic vinegar. Serve warm or store in the fridge for up to a week.

20140129-210113.jpg
It’s amazing to me how good roasted cruciferous veggies taste! Broccoli and cauliflower cooked this way are excellent too. Enjoy! One last look because they’re so pretty!

20140129-210239.jpg

Green Applesauce

Remember when I made that basic green juice? It’s great and all, but all the apple and spinach pulp make it kinda chunky. After letting my green juice sit in the blender for 5 minutes this morning, I discovered a use for all that pulp!

20140116-081348.jpg
Green applesauce!

It’s so easy. Just let any green juice you make in the blender sit for a few minutes. The pulp will rise to the top while the liquid becomes clear below. Carefully pour out the bottom layer of juice and save the pulp. Once you’re done drinking your glass of green juice, enjoy the tasty pulp as a simple applesauce. This way none of the nutrients go to waste and you don’t have to drink a chunky juice.

20140116-081650.jpg
Ingredients:
1 green apple, quartered
1 big handful fresh spinach
1 tbs lemon juice
*optional* 1 cup water and 1 cup ice

Directions:
1. Combine all ingredients in a high powered blender. The water and ice will create green juice AND applesauce. Omitting the water and ice will yield just applesauce, and it’s a little harder to blend this way. Blend on high setting until smooth.

2. If using water and ice, allow the mixture to sit in the blender for a few minutes until it separates. Carefully pour out the liquid into one glass and spoon the pulp layer off into another glass. Enjoy both!

20140116-082222.jpg
This recipe is great for kids! The applesauce has a pretty green color, but doesn’t taste at all like like spinach.

Green Lentil Quinoa Pilaf

On this overcast day, I decided to make a satisfying vegetarian lunch bowl. The following recipe can be served solo or as a tasty and protein packed vegetarian side dish! The chewy quinoa and lentils have a wonderful texture, while the tomato, garlic, and cumin bring the dish to life with a big burst of flavor.

20130907-154211.jpg

Ingredients:
1/2 c dry green lentils
1/2 c dry quinoa
2 c vegetable broth
1 tbs olive oil
1 tsp garlic powder
1/4 tsp tarragon
1/2 tsp cumin
1/2 tsp salt
1 tbs minced onion
1 c tomato sauce

1. Being quinoa, lentils, and vegetable broth to a boil.

2. Add olive oil and seasonings (everything except tomato sauce). Reduce heat and simmer for 15-20 minutes until all liquid is absorbed.

3. Stir in tomato sauce and adjust seasonings to taste. Serve warm or chilled.

20130907-154727.jpg

Cucumber Radish Apple Salad

I made this salad for a potluck last week. It’s very refreshing for the summer! The cucumbers are juicy, the radishes are spicy, and the green apples are tart and sweet.

1. Start by thinly slicing 1/2 an English cucumber, 1 green apple, and a handful of radishes. I used a mandolin slicer, but a food processor would get the job done faster.

2. Combine in a large bowl. In a separate bowl, combine 1 tbs honey, 1 tbs olive oil, and 2 tbs lime juice. Mix with 1/4 cup fresh chopped mint. Toss the salad with dressing and enjoy!

Today I tried to recreate the salad using a different dressing for my sugar detox. Unfortunately, the white wine vinegar, mustard, and garlic called for in my dressing recipe ruined the beautiful flavor of this salad. I’d recommend sticking to the honey, lime, and mint combo!

20130606-131802.jpg