Breakfast Pizza

There’s a restaurant in Las Vegas that serves a delicious breakfast pizza on the weekends. If you’re in town, I highly recommend checking out Honey Salt for a great mimosa brunch on the patio. Even if you aren’t a Vegas local, you can recreate Elizabeth Blau’s tasty breakfast pizza at home with this simplified replica I came up with. Did you know you can buy raw pizza dough at most pizzerias for just a few bucks? This is great news for making pizza at home easily! Just call your favorite pizza shop and ask. I got the dough for this recipe from Trader Joe’s. They have a great wheat dough ball that’s only $1.19.

IMG_0555

Ingredients:

(serves 4)

1 lb dough ball of your favorite pizza dough (preferably whole wheat!)

1 teaspoon olive oil

1/2 cup frozen chopped spinach, thawed

Splash of milk (about 2 tablespoons)

6 oz reduced fat shredded mozzarella cheese

8 large eggs

1 tablespoon butter

Salt & Pepper

Grated parmesan, parsley, and/or hot sauce for garnish

Preparation:

  1. Preheat the oven to 425 degrees F. Allow the dough to rise at room temperature for 30 minutes, uncovered.
  2. Divide the dough into 4 equal parts and shape each portion into an individual pizza crust. Place all four on a large baking sheet or two smaller baking sheets that will fit side-by-side in the oven.
  3. Heat the olive oil in a small nonstick skillet over medium heat. Sauté the spinach for about 2 minutes until hot and add a splash of milk. Continue to cook until most of the liquid is absorbed. Season with a dash of salt and pepper.
  4. Extend the spinach mixture evenly among the four pizza crusts, spreading it as close to the edges as you can.
  5. Top each pizza with about 1.5 oz of shredded cheese. Bake for 12 minutes or until the cheese is becoming golden and bubbly.
  6. While the pizzas are baking, whisk the eggs vigorously in a medium mixing bowl. Scramble slowly in a medium nonstick skillet coated with melted butter over low-medium heat. Scramble until nearly finished, but not fully cooked through. Season with salt and pepper.
  7. Top each pizza with an equal portion of the eggs and return to the oven for 1-2 minutes more, or until the eggs are fully set.
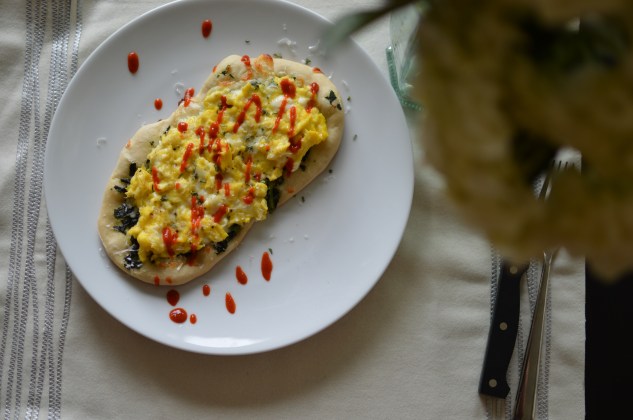
  8. Serve with your favorite garnish and a side of fruit. I topped my pizza with freshly grated parmesan, parsley, and sriracha sauce. Enjoy!

I was nervous about the timing of baking the crust, adding the cheese, and knowing when to incorporate the scrambled eggs, but it ended up being a very intuitive process. The basic idea is that you’re baking a pizza 90% of the way through and adding eggs that are 90% finished, then finishing the last 10% of the cooking process with all ingredients combined. I think you’ll like it!

Here’s a close up of the eggs and cheese, pre-hot sauce.

IMG_0559

Make it a little messy for a nice plated look:

IMG_0554

Nutrition information, per individual pizza without garnish:

Screen Shot 2016-04-18 at 7.08.14 AM


Baby Kale and Arugula Salad with Grapefruit Vinaigrette

Do you have the Jaime Oliver app on your smartphone or tablet? I’ve had it for years, but hadn’t used it. He has these awesome tutorial videos on there that teach you basic cooking skills. I really liked the ones about how to pick fresh fish, how to make vegetables taste amazing, and how to make an incredible salad. The dressing recipe for my post today is based on his tips! The fresh baby kale and arugula in the salad are from The Gilcrease Orchard here in Las Vegas. If you live in the area, you should definitely check it out. You can pick your own fruits and vegetables from the orchard and buy them for around $1 per pound. It’s amazing how much produce can grow in the desert! 

Colby and I started an indoor herb garden with basil, thyme, rosemary, parsley, and sage. By started I mean we bought the potted herbs from Trader Joe’s and are trying not to kell them… I’d love to start a little herb and vegetable garden in our backyard this year. I am very inspired to start a garden after meeting with the executive director of Create a Change Now Foundation. The organization builds gardens in at-risk elementary schools in Southen Nevada and develops nutrition education programming centered around the garden in an effort to reduce childhood obesity rates here. 

My coworker and I attended a fundraising dinner for the organization a few weeks ago. The kids harvested 119 pounds of produce from their school garden and local chefs prepared a delicious meal using the vegetables grown there. It was very cool to see! I am hopeful that we will be able to put a garden in at my office, too. We work with overweight children and their families, so having a garden on site would be an amazing resource!

Anyway, here’s a sweet and citrusy salad recipe for you!

Ingredients:

For the dressing:

2 tablespoons olive oil

1/2 tablespoon fresh lemon juice

1/2 tablespoon grapefruit juice

1-2 teaspoons honey

Salt & pepper to taste

For the salad:

2 cups baby kale

2 cups baby arugula

1 cup diced fresh fruit (I used oranges and raspberries)

1 tablespoon chopped mint leaves (optional)

Preparation:

Whisk together the dressing ingredients and drizzle over the salad ingredients. Toss together gently using your hands and top with freshly ground black pepper. Enjoy!


Easy Zucchini Noodle Ramen Pasta

Thanks, Recipe ReDux, for reminding me that it’s tax season and I have yet to file our return! The past few weeks have been crazy busy, so this month’s ReDux theme of “seven ingredients or less” is much appreciated. You too can have dinner ready in under 10 minutes with this breeze of a meal!

IMG_0548

Ingredients:

(serves 1)

1 block of brown rice ramen noodles (found them at Costco)

1 teaspoon olive oil

1/4 cup red onion, sliced

3 oz cooked chicken breast, shredded

1  jarred roasted red pepper, sliced into thin strips

1 teaspoon chicken bullion paste

1 large zucchini, cut into long strands

Preparation:

  1. Cook the ramen noodles according to package instructions, boiling for about 4 minutes in a small saucepan.
  2. While the noodles cook, heat the olive oil in a skillet. Sauté the red onion, chicken, and red pepper for 2 minutes.
  3. Stir in the bullion paste, hot drained ramen noodles, and zucchini strands. Serve immediately.

IMG_0546

This dish is fast, nutritious, and tastes like a guilty pleasure! By bulking up the ramen with zucchini noodles you can enjoy a heaping bowl of comfort food and feel great about your decision.

450 calories/ 59 grams carb/ 9 grams fat/ 31 grams protein/ 7 grams fiber

IMG_0547


Molten S’mores Brownie

This single serve brownie is only 200 calories and low in fat! It’s a perfectly decadent tasting dessert, but the oil is swapped for Greek yogurt. The brownie is awesome on its own, but the marshmallow graham cracker topping takes it to another level!

Single serving desserts are awesome if you struggle with portion control. Instead of having a whole pan of brownies staring at you from the kitchen, you make just one very special brownie to savor. I find that baking it gives it a nice fudgy texture, but you could make it in the microwave for faster prep time.

  
Ingredients:

(Serves 1)

35 grams (1/4 cup) boxed brownie mix

1 tablespoon nonfat plain Greek yogurt

1/2 tablespoon water

1/2 tablespoon egg whites

10 mini marshmallows

1/4 piece graham cracker

Preparation:

1. Preheat oven to 325 degrees. 

2. Mix together brownie mix, yogurt, water, and egg white in a small bowl. Transfer the batter to a ramekin greased with cooking spray.

3. Bake for 20 minutes. Top with marshmallows and graham crackers and broil until the marshmallows begin to brown, about 2-3 minutes.

  
To prepare in the microwave, cook for 1 minute, then at 10 second intervals until the batter is just barely set. Do not overcook!

  
Enjoy! It’s awesome :) for my macro counting friends: 28g carb, 4g fat, 1g pro, 1g fiber. I used Ghiradelli Triple Chocolate brownie mix for these calculations.

Pancake Mix Mug Cake

Need a fast breakfast that’s packed with protein, whole grains, and fruit? Search no further! I’ve been experimenting with easy ways to make mug cakes. This one is healthy enough to eat for breakfast and is perfect for this month’s Recipe Redux theme!

If you haven’t tried Kodiak Cakes pancake mix yet, you’ve been missing out! It’s made from whole wheat, oats, whey protein, and buttermilk. This pancake mix rocks because it makes hearty yet fluffy pancakes and is very versatile! It’s perfect for mug cakes like this one.

My favorite thing about this particular mug cake is that you only need a few ingredients and can mix everything together in one cup! This saves a lot of time in preparation and clean up. Definitely a must for busy mornings!

IMG_0523


Ingredients:

(Serves 1)

1 teaspoon canola oil

1 tablespoon maple syrup or honey

2 tablespoons milk of choice

1/4 cup Kodiak Cakes pancake mix

1/4 cup frozen fruit of choice (I used mixed berries and sliced bananas)

1/2 cup vanilla Greek yogurt

Additional toppings (optional- I used sliced plum and hemp seeds. You could try granola, sliced nuts, and/or fresh fruit!)

Preparation: 

  1. Whisk oil, sweetener, and milk of choice in a microwave safe mug.
  2. Whisk in pancake mix.
  3. Top with frozen fruit.
  4. Microwave for about 1 minute 15 seconds – 1 minute 30 seconds, or until the batter is set
  5. Spoon Greek yogurt on top and sprinkle with any additional toppings of your choice!

That couldn’t be any easier! Please share your variations in the comments. I’ve tried this recipe with mini chocolate chips and banana slices in the batter as well. It’s very good topped with some milk instead of Greek yogurt, too! This is what the mug cake looks like without toppings:

IMG_0524


I think I’ll be having it again as a late night snack! Check out these other ideas to get out of a breakfast rut:

Turkey Stuffed Acorn Squash

This recipe tastes like Thanksgiving. It’s February, but that’s ok! In fact, I’ll be roasting our Thanksgiving turkey this month. I read in Cooking Light Magazine that carving the turkey first and then roasting the individual pieces yields better results. I’ll be sure to share how it turns out!

In the meantime, make this tasty dish that’s hearty and flavorful!

3B76020D-E3DB-4C31-B15B-BABF139A0E9F

Ingredients:

(Makes two halves, 4 servings)

1 acorn squash, cut horizontally and seeds removed

Cooking Spray

1 lb lean ground turkey

1 tablespoon olive oil

1 cup diced celery

1 cup diced onion

2 cloves garlic, minced

1/4 cup diced cranberries

1 tablespoon chicken broth concentrate (or 1 bouillon cube dissolved in 1 tablespoon boiling water)

1 teaspoon dried sage

1 teaspoon dried thyme

Freshly ground pepper

B7F659DF-76D4-4D53-9427-BF365BB8C12C

Preparation:

  1. Roast the acorn squash cut side down on an aluminum foil lined baking sheet sprayed with cooking spray at 375 degrees for 45 minutes, or until tender.
  2. 10 minutes before the squash is done, brown the ground turkey in a 10″ nonstick skillet. Do not drain. Transfer the turkey and any liquid to a separate bowl.
  3. Heat 1 tablespoon olive oil in the 10″ skillet over medium-high heat. Add the celery and onion. Sauté until the onion begins to turn translucent, about 5 minutes. Add the garlic and cranberries. Sauté 1 minute longer, until fragrant. Add the turkey back in, along with the bouillon paste.
  4. Season with sage and thyme. Transfer the meat and vegetable mixture into the acorn squash halves and serve hot, topped with freshly ground black pepper.
  5. If you have leftovers, you can scoop out the acorn squash into a storage container and stir together with the meat filling to make a tasty squash hash.

F7E8AF0E-0EB8-4C1D-BD7F-E49873E80D9E

The concentrated chicken broth really brings out the flavor in this dish. I hope you enjoy it as much as I did!

Buffalo Chicken Wing Soup

Got leftover chicken wings? Don’t throw them out! Make this soup instead. Colby makes great chicken wings for football games; he’s perfected his technique over the past year. This last time, Colby doubled his recipe.. and brought home a supreme pizza, ice cream, chips, and chocolate! Needless to say, we had plenty of leftovers!

I was making buffalo chicken salad sandwiches for him this week (pull meat off the bones, chop, add diced celery, and dress with ranch or bleu cheese dressing), but it got to be a pain to pull the tiny bits of meat off the bones.

Determined not to let his tasty wings go to waste, I made this buffalo chicken soup! It’s spicy and very savory thanks to the chicken bones. You could easily make it using chicken breast instead of leftover wings, though!

IMG_0010

If this is what you’re looking at the day after the Super Bowl, give this recipe a try!

IMG_0007

Ingredients:

(Serves 6-8)

1-2 lbs leftover buffalo wings (or 1 lb cooked shredded chicken)

2 cups chicken stock, boiling

2 cups water

15 oz can whole tomatoes, mashed

4 carrots, diced

3 stalks celery, diced

1 medium onion, diced

1 jalapeño, seeded and diced

1 bay leaf

1-2 teaspoons dry ranch seasoning (or salt, according to taste)

1/4 cup Frank’s Red Hot Sauce (or more if you like it super spicy!)

Sour cream, bleu cheese dressing, or ranch dressing for serving

Directions:

  1. Place the leftover buffalo wings in a large saucepan containing the boiling chicken stock. Boil for about 5 minutes, just long enough for the skin to come loose.
  2. Use tongs to transfer the wings, one at a time, into a large bowl of ice water. Use your hands to peel the skin off the wings. Throw out the skin and place the meat and bones back into the simmering stock. Repeat for all the wings.
  3. Add the water, tomatoes, diced vegetables, bay leaf, ranch seasoning/ salt, and hot sauce to the saucepan. Bring to a boil then cover, reduce heat to low, and simmer for 1 hour, or until all vegetables are tender and chicken is falling off the bone.
  4. Lade into serving bowls and garnish with sour cream, bleu cheese dressing, or ranch dressing.

IMG_0012

PS- you could easily make this recipe in a slow cooker. Simply combine all ingredients in a slow cooker after skinning the chicken wings and cook on high for 3-4 hours or low 6-8 hours. Enjoy!!

IMG_0009

By the way, do you like my snazzy new photography setup? I picked up the supplies at Lowe’s: piece of drywall, white subway tile, marble tile, tile adhesive, and caulk. It only took about 30 minutes to build, so I’ll probably make another setup sometime soon! I think dark wood, sandstone, or slate would look nice.

IMG_0011

Slow Cooker Chicken Enchilada Soup

Does your slow cooker need a little attention? I was inspired to dust mine off after teaching a cooking class with the UNLV Nutrition Center this week. We showed families how to use a slow cooker to make brown rice, healthy fruit compote, and a variation of this delicious soup!

It started out as a chicken tortilla soup, but the idea of an enchilada soup had me drooling. I tweaked a few things to make this soup a healthy comfort food. To make this soup cheesy yet lower calorie, put the gooey stuff where it counts- on top! By broiling the cheese on top of the soup rather than in the broth, you get all the flavor hitting your palate right away without getting diluted. The golden cheese topping makes this dish reminiscent of french onion soup. The classic latin American flavors shine through, so I hope you’ll curl up with a bowl of it on a night that you’re craving Mexican food!

IMG_0003

Ingredients:
(serves 7)

1 lb cooked shredded chicken

15 oz can of crushed tomatoes

10 oz green enchilada sauce

1 medium onion, chopped

1 jalepeno pepper, seeded and diced

2 cloves garlic, minced

10 oz frozen corn

2 cups chicken stock

2 cups water

1 bay leaf

1 teaspoon chili powder

1 teaspoon cumin

1 teaspoon salt

7 oz shredded cheese (Cheddar or Mexican blend)

7 corn tortillas

Canola oil spray

chopped cilantro, lime, avocado, and/or sour cream for garnish

Directions: 

  1. Combine chicken, vegetables, chicken stock, water, and spices in a large slow cooker. Cook on low for 6-8 hours or high 3-4 hours.
  2. Preheat oven (or toaster oven) to 400 degrees. Cut corn tortillas into slices or strips, spritz evenly with canola oil spray, and lay in a single layer on a baking sheet. Bake for 10-15 minutes until golden and crispy.
  3. When ready to serve the soup, ladle into ceramic bowls and top each portion with one with 1 oz of shredded cheese.
  4. Broil the soup until the cheese is bubbly and golden. Top with tortilla crisps and serve with cilantro, lime, sliced avocado, and/or sour cream.

**I forgot to put the tortilla strips on my soup for photographs.. dang it! I’ll get it right next time.

IMG_0006

Here’s what the soup looks like “naked” (without the cheese topping):

IMG_0004

And here it is all dressed up in its glorious cheese crust… mmmmmm….

IMG_0001


Moroccan Chicken Tagine over Kamut

Bored of the same old flavors when eating clean? Try this bold dish to excite your taste buds! This month’s Recipe ReDux theme is using new ingredients. My recipe features THREE new (to me) ingredients/ tools.

Tagine (tajine)- This is an earthenware pot in which the North African dish by the same name is cooked. Traditionally, this clay pot is placed over hot coals and is used in a cooking method similar to roasting. In this recipe, I place the tagine in the oven. The cone shaped lid helps any condensation that forms return to the bottom. A similar result can be achieved by using a slow cooker!

  
Raz el Hanout- This is a spice mix used in North African (typically Moroccan) dishes. It means “head of the shop” (or top shelf), referring to the best spices the seller has to offer. It is traditionally rubbed on meat or stirred into couscous or rice in savory dishes. The blend that my sister found at World Market is made of ginger, pepper, nutmeg, cinnamon, allspice, cayenne, and… “other spices”?? These are most likely cardamom, cumin, and/or coriander. Big, bold flavors here!


Kamut (khorasan wheat)- Traditional Moroccan tagine is served over couscous or plain white rice, but I decided to try out a different whole grain to shake things up a bit. This ancient grain is rich in protein, fiber, B vitamins, and manganese (an essential mineral). Half a cup of cooked kamut has only 140 calories and 6 grams of protein- that’s about 40% more than wheat! Kamut is not gluten free. Its flavor is slightly sweet, nutty, and buttery. The texture is pleasantly chewy with a bit of a bite. I’ll be trying it in a salad next time!

  
Ready? Here comes the recipe for a delicious dish bursting with flavor! If you’re eating healthy and ready to try something new, this is the meal for you!

  
Ingredients:

2 large chicken breasts

1 teaspoon raz el hanout

2 teaspoons honey

2 garlic cloves, minced

pinch of dried chili flakes

4 tablespoons olive oil

1 tablespoon lemon juice

1 tablespoon salt

3 cups boiling water

1 cup kamut

1 large onion, thinly sliced

1 3/4 cups vegetable stock

15 oz can garbanzo beans, drained and rinsed

1 1/2 cups grape or cherry tomatoes, sliced lengthwise

1/4 cup pitted green olives

Fresh chopped cilantro (optional)

Preparation:

  1. Pound the chicken breasts with a mallet on a cutting board to 1″ thick. Cut each breast into 4 chunks.
  2. Whisk together raz el hanout, honey, garlic, chili flakes, olive oil, lemon juice, and salt in a glass dish. Place the chicken breasts in the mixture, coat well, cover, and refrigerate 8-12 hours.
  3. Combine Kamut and boiling water in a saucepan. Simmer on low heat, covered, for 1 hour. If using a slow cooker, do this step about an hour before serving the meal.
  4. If using a tagine, preheat the oven to 350 degrees. While the kamut cooks, pan fry the marinated chicken breasts over medium-high heat until golden on all sides. Transfer the browned chicken and remaining marinade into the tagine or slow cooker.
  5. Top the chicken with onions, vegetable stock, garbanzo beans, tomatoes, and olives. If using a tagine, cover and cook in the oven for 1 hour until the chicken is tender and cooked to an internal temperature of 165 degrees F. If using a slow cooker, cover and cook on high for 4 hours or low for 8 hours.
  6. Serve over cooked kamut topped with fresh cilantro, salt, and pepper.

  
The flavors in this dish are vibrant an unique! I’m looking forward to trying other dishes cooked in the tagine. Check out the links below for other recipes developed by the Recipe ReDux crew!