Creamy Vegan Risotto

I received free samples of Progresso Cooking Stock mentioned in this post at no cost. By posting this recipe I am entering a recipe contest sponsored by Progresso Cooking Stock and am eligible to win prizes associated with the contest. I was not compensated for my time.

Risotto has always been an intimidating dish to me. I always assumed it takes a lot of culinary skill to make it properly. In fact, my first attempt at making risotto in the oven failed miserably. Fortunately, my sister is a chef and she took the time to show me the right way to make it. Turns out it’s not very difficult or time consuming! The most important thing is to pay attention to the rice to keep it from getting overcooked and gluey.

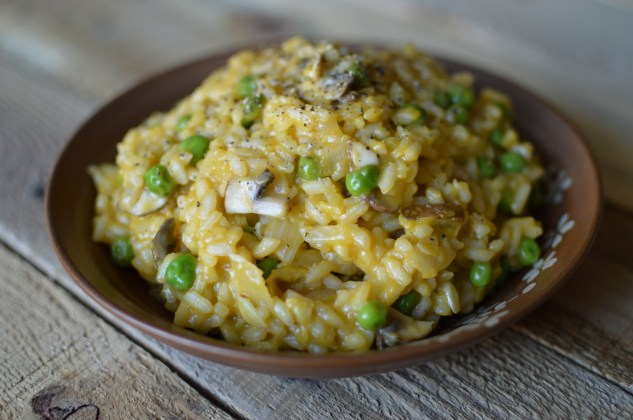
Agata taught me to make a very creamy risotto with parmesan and mascarpone. It was incredibly delicious!! For this Recipe Redux challenge, I decided to make a risotto that is just as creamy without the addition of cheese. I’m so excited to show you that it’s possible to make a flavorful, creamy risotto dish that is completely vegan! Thanks to Progresso’s Vegetable Cooking Stock, you get depth of savory flavor without animal products. The #ProgressoEatsContest gave me the opportunity to experiment a bit.

In case you didn’t know that Progresso launched a line of tasty cooking stocks, here are some details about the products:

  • Now available in grocery stores nationwide in the soup aisle, Progresso premium Cooking Stocks are made by simmering real bones, vegetables and herbs to create a flavor that’s close to homemade.
  • Due to the process Progresso’s chefs use to simmer the real bones, Progresso Cooking Stocks have rich, meaty flavor and are full of body, making them ideal for adding deep, complex flavor to many dishes including soups, stews, sauces and gravies.
  • Made without artificial flavors and with just 15-45 calories /95-420mg sodium /0-1g fat per serving, Progresso Stocks offers a clean way to boost your flavor game.

I used the chicken stock to make a delicious soup, but was even more impressed with the depth of flavor imparted by the hearty vegetable stock. It really shines through in this recipe!

IMG_0455

Ingredients:

(Serves 3-4)

2 tablespoons olive oil

1/2 cup diced yellow onion

1 clove minced garlic

3/4 cup arborio rice

1/3 cup dry white wine

3 cups simmering Progresso Vegetable Cooking Stock

1/2 cup diced mushrooms

1/2 cup frozen peas

salt and freshly ground pepper

Preparation:

  1. Heat olive oil in a medium nonstick saucepan over medium-high heat. Add the diced onion and stir constantly until softened and translucent, about 3 minutes.
  2. Add the minced garlic and arborio rice to the saucepan. Stir constantly to coat with olive oil and toast, another 3 minutes.
  3. Add the white wine and stir until the liquid is absorbed and some of the alcohol has cooked off, another 2-3 minutes.
  4. Add enough vegetable stock to just cover the rice. Stir constantly until most of the liquid is absorbed. Add another 1/2 cup of stock to the rice. Repeat this process of adding the stock gradually and stirring frequently until the rice is cooked al dente. Do not overcook! The process of adding the stock 1/2 cup at a time should take about 15-20 minutes over medium-high heat.
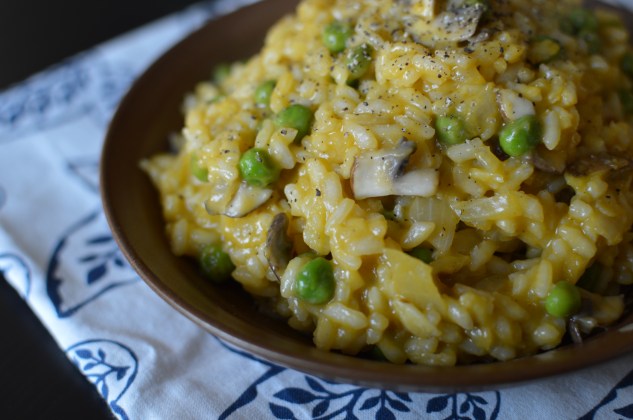
  5. Fold in mushrooms and frozen peas. Stir for about 2 minutes until the vegetables are heated through. Season to taste with salt and freshly ground pepper.

The whole process takes less than 45 minutes and is well worth the effort! This risotto is creamy like mac n’ cheese and maintains a nice texture from the al dente cooked rice and pop of the green peas. Enjoy!

IMG_0459

Bacon Peanut Butter Christmas Dog Treats

I’m alive! And cooking :) I decided to jump back into the Recipe ReDux this month with a fun challenge: to make over a recipe from page 54 of a cookbook to celebrate the Redux’s 54 week birthday. My recipe is a makeover from The Vegan Cookie Connoisseur by Kelly Peloza. She writes a delicious recipe for thin and crispy peanut butter cookie. Peanut butter chocolate Christmas cookies are my favorite, so I decided to make a dog-friendly variation that’s easy to make and nutritious for pups. It’s no longer vegan, though. Humans get lots of holiday cookies this time of year, but what about our pets? Have them join in on the festive snacking with this treat recipe!

  
Ingredients:

(Servings very depending on treat size. I made about three dozen 1.5″ flower treats)

-4 strips of bacon, cooked crisp and crumbled

-1 cup creamy peanut butter

-1 egg

-1 cup milk (I used 1% milk)

-2 cups bread flour

-1 teaspoon baking powder, plus more for dusting

Preparation:

1. Preheat oven to 375 degrees F. Combine bacon, peanut butter, egg, and milk in the bowl of a stand mixer. Whip until well combined, about 60 seconds at medium speed.

2. Stir together bread flour and baking powder in a separate bowl, then add half of it to the stand mixer. Stir it in at low-medium speed, then gradually add the remaining flour. Mixture may be crumbly, but sticky enough to become cohesive.

3. Form the dough into a ball with your hands. Place the ball on a lightly floured surface.

4. Roll the dough out about 1/4″ thick. Cut out shapes using cookie cutters. 

5. Bake the treats on a cookie sheet lined with parchment paper for 10 minutes, then pull the cookie sheet out, flip the treats over, and bake 10 minutes more. Baking time may vary depending on the size of the treats, so be sure to watch them closely.

6. Allow the treats to cool fully before giving them to your dogs! Can be stored in an airtight container in the fridge for up to 1 week.

  
 Merry Christmas!

Check out other recipes from the ReDux below:

Almond Cake Batter Protein Oatmeal

I love dessert! I especially love dessert that tastes decadent but is healthy enough to eat for breakfast. This recipe is a winner because it balances the flavor of cake batter with fiber (from almonds and oats), healthy fats (almonds again!), and protein (vanilla protein powder). These oats are so delicious you’ll probably crave them every day. I still love them, and since I’ve perfected the recipe over the past 3 years, I’m excited to share it with you today!

  
Ingredients:

(Serves 1)

-1 serving of your favorite oatmeal, prepared with a little extra water (I love Coach’s Oats: 1/3 cup dry oats cooked with 1 1/4 cups of water for 4 mins in the microwave at 70% power)

-1 tablespoon chia seeds

-1 serving of vanilla protein powder (I use whey isolate or casein typically)

-2 tablespoons sliced almonds

-1/4 teaspoon ground cinnamon (optional) or a pinch of dark brown sugar (optional)

Preparation:

1. Cook the oatmeal according to package instructions. 

2. Stir in chia seeds and allow to cool for about 5 minutes.

3. Stir in vanilla protein powder gradually until it is fully absorbed and not clumpy.

4. Serve sprinkled with sliced almonds. Top with cinnamon and/or dark brown sugar, if desired.

  
I like to keep all the ingredients at work for days that I don’t have time to pack a lunch or feel extra hungry in the afternoon. My coworkers always ask, “who made cinnamon rolls?” because it makes the office smell so good! If you have a favorite variation of protein oats, please share it in the comments! Be sure to check out the other Recipe Redux “nut” themed entries for October below:

Homemade Nutty Seed Crackers with Hummus

By posting this recipe I am entering a recipe contest sponsored by Sabra Dipping Co. LLC, and am eligible to win prizes associated with the contest. I was not compensated for my time.

Hummus is for dipping! Here’s a recipe for crunchy crackers to dip in your favorite variety of Sabra hummus. My favorite is the Supremely Spicy flavor, although I’m hunting for their new pizza flavor. 

  
Ingredients: (4-6 servings)

2 oz all purpose flour

2 oz almond meal

1 tablespoon sesame seeds

1 tablespoon poppy seeds

1/2 teaspoon sea salt

3/4 teaspoon baking powder

1 tablespoon olive oil

3-4 tablespoons water

Preparation:

1. Whisk together all dry ingredients in a medium mixing bowl. Add in olive oil and enough water to make the dough bind, but not overly sticky.

2. Turn the dough out on a lightly floured surface and knead 8-10 times, or until it forms a ball. Divide the dough in half and place back in the mixing bowl. Cover with a lightly damp towel for 15 minutes and preheat the oven to 450 degrees.

3. Roll half the dough out 1/8 inch thick and bake on a cookie sheet for 6 minutes, or until golden. Transfer to a cooling rack. Repeat with the other half of the dough.

4. Break into pieces once it’s cool and serve with hummus dip! Extra crackers can be stored in an airtight container for about a week.

Pumpkin Protein Muffins

I should probably be studying… or writing an article that’s due Wednesday. I swear I’l get to all that, but I had to interrupt all that to bake muffins! Colby and I bought this pumpkin pecan waffles candle at Bath and Body Works yesterday,  and the decadent smell compelled me to make a pumpkin treat. It was definitely worth taking a break to make these pumpkin protein muffins– they’ll be a great study snack anyway. Each muffin has a balanced macronutrient ratio to power a study session or keep you focused at work or school between meals: 85 calories, 12 grams of carbohydrate,  2 grams of fat, and 5 grams of protein. 

  
Ingredients:

(Makes 24 muffins)

1 cup oat flour (Rolled oats crushed in a blender)

1 cup all purpose flour

2 scoops vanilla whey protein isolate (I used Quest brand)

1 teaspoon baking soda

1 teaspoon baking powder

1/2 teaspoon salt

1 teaspoon cinnamon

1/2 teaspoon nutmeg

1/4 teaspoon ground ginger

1 can pumpkin puree (15 oz)

1/2 cup light brown sugar

1/2 cup egg whites

1/2 cup plain, nonfat greek yogurt

1 cup skim milk (or almond milk)

1 tablespoon vanilla extract

nonstick cooking spray

2/3 cup chopped walnuts

Preparation:

1. Preheat oven to 350 degrees. Whisk together all dry ingredients (starting with oat flour down to ground ginger) in a mixing bowl or large measuring cup. 

2. In a separate mixing bowl, stir together all wet ingredients (pumpkin puree to vanilla extract). Fold in the dry ingredients and stir until well incorporated.

3. Grease two muffin pans (24 muffins) with cooking spray and use a 1/4 cup measurng scoop to fill each cup about 2/3 of the way full. Sprinkle each with a few chopped walnuts and bake for 12-15 minutes, or until a toothpick inserted in the fluffiest muffin comes out clean. 

4. Cool on a cooling rack and serve warm! These freeze well in zip top bags. They also keep well in a refrigerated airtight container for about 2 weeks. 

  
The pumpkin puree and greek yogurt make these muffins perfectly moist despite the omission of fat in the batter. That means you can slather these with some whipped butter knowing they aren’t aleady full of oil or fat! I hope you’ll enjoy them as much as I do. Have a great week, everyone! 


Freezer Meals for Beginners

It sounds amazing, doesn’t it? To cook one day and eat for a month and save money in the process? So many moms on Pinterest do it like it’s no big deal. For some reason, though, the idea of making a bunch of meals and freezing them for the week or month has always seemed intimidating to me. Thankfully, this month’s Recipe Redux theme is freezer meals, so I had some motivation to overcome my fear of cooking in bulk. I did my research and have compiled some tips for other beginners (like me) right here:

Things you’ll need:

  • Freezer bags or freezer safe plastic containers
  • Measuring cups and spoons
  • 6 quart crockpot (but not for today’s recipe)
  • Freezer space
  • Large mixing bowls
  • Permanent marker

Honestly, that’s about as far as I got in my research before realizing I can totally handle this and so can you! So let’s get right to it. My very first freezer meal is a seasoned turkey burrito bowl. I chose this recipe because you can easily freeze each component separately to use in other dishes if you get tired of eating burrito bowls. I was also inspired by the cooking philosphy in the cookbook “Well Fed,” in which Melissa Joulwan does all the chopping of vegetables and cooking of meats on Sundays like a CrossFit workout for time and then assembles the prepped ingredients on weeknights to finish off her meals in just a few minutes. Thinking of meal prep as a timed workout helps to make the process more efficient! By the way, if you’re cool with eating the same thing every night, you could store this meal in the fridge instead of the freezer and enjoy dinner for one 5 nights in a row. 

  
Turkey Burrito Bowls

Ingredients:

(Serves 5)

-20 oz lean ground turkey

-2 tablespoons taco seasoning

-1 cup brown rice

-1 tablespoon olive oil

-1 large onion, sliced

-1 green bell pepper, sliced

-1 red bell pepper, sliced

-1 can black or pinto beans, drained and rinsed

-For serving: shredded lettuce, salsa, avocado, shredded cheese, and/or sour cream

Preparation:

1. Brown the ground turkey in a 10″ skillet, breaking it into crumbles until no longer pink inside. Add taco seasoning and stir to thoroughly coat the turkey. Set the meat aside to cool.

2. Cook the brown rice on the stovetop or in a rice cooker by combining 2 and a half cups of water with the cup of rice, bringing to a boil, and reducing to a simmer until all liquid is absorbed (30-45 minutes).

3. Heat the olive oil in a 10″ skillet over medium high heat. Once hot, sauté the vegetables until they begin to soften and caramelize, abot 5 minutes.

4. Divide the ground turkey, cooked brown rice, sautéed vegetables, and black beans among 5 sandwich sized zipper bags or pint sized plastic freezer containers. Freeze until ready to serve.

5. When ready to eat, transfer the contents of the freezer bag or container to a microwave safe dish and defrost according to microwave instructions. Alternatively, you can thaw the contents of the freezer bag/ container in the fridge during the day and zap for a minute or two on high power when ready to eat.

6. Top with shredded lettuce, salsa, avocado, shredded cheese, and/ or sour cream and serve! 

That really wasn’t so bad! I don’t have much freezer space, but I’m excited to try some more freezer meals for a family of two. Pre-prepped meals will definitely be useful over the next few months while I’m studying for the MCAT and have no time to cook!

  
Check out some more healthy freezer meals below:

Supreme Pizza Quinoa Bites

By posting this recipe I am entering a recipe contest sponsored by California Ripe Olives and am eligible to win prizes associated with the contest. I was not compensated for my time.

Football season is upon us! Here’s a game day snack that makes football worth watching! Have 4-6 of them and make it a meal that works for breakfast, lunch, or dinner. Bite sized foods are just the best, and these are nutritionally balanced so you can feel good about munching on them. These mini pizza bites get a flavor boost from California black ripe olives, which contain monounsaturated fat, vitamin E (0.25  mg per serving), iron (.49 mg per serving), vitamin A (60 IU per serving), and fiber (0.5 grams per serving). If you have a can of these in your pantry, think beyond the typical Greek salad and try out these  pizza bites!

  
Ingredients:

(Serves 2-3 as a meal, 3-6 as a snack)

-1/2 cup quinoa, uncooked

-1 cup water

-1 tablespoon olive oil

-1/2 cup onion, diced

-1/2 cup zucchini, diced

-1/2 cup California ripe black olives, about 10, diced

-1/3 cup roasted red pepper, diced

-1/3 cup cooked and drained lean ground turkey

-1/2 teaspoon dried basil

-1/2 teaspoon dried oregano

-1 teaspoon garlic salt

-1 egg

-4 egg whites

-1 cup shredded part-skim mozzarella

-1/4 cup feta cheese, crumbled

-Cooking spray or olive oil for greasing muffin tins

-Pizza sauce, for serving

Preparation:

1. Begin by rinsing and draining the quinoa well in a mesh strainer. Combine the rinsed quinoa and 1 cup of water in a small saucepan. Bring to a boil, then reduce the heat to a simmer and cover. Cook for 15 minutes and remove from heat.

2. Heat olive oil over medium heat in a 10″ skillet, add the diced onions and zucchini and cook, stirring occasionally, for 5 minutes. Stir in diced black olives, roasted red pepper, cooked ground turkey, basil, oregano, and garlic salt. Set aside.

3. Preheat the oven to 350 degrees. Fluff the quinoa with a fork and transfer to a mixing bowl. Stir in egg, egg whites, mozzarella cheese, and cooked vegetable/ turkey mixture. 

4. Scoop the mix into a well greased muffin tin (12 cups) or mini muffin tin (24 cups). Sprinkle each with a bit of feta cheese and bake. The regular muffin tins will require 25-30 minutes and the mini muffins will require 15-20 minutes. 

5. Remove carefully from the tins using a spoon and serve warm with pizza sauce. 

  
I hope that you’ll enjoy these Mediterranean inspired supreme pizza bites this football season! They reheat easily in the microwave and store well in the fridge or freezer. 

Thai Steak Frittata

I sooo wanted to enter this recipe in the Beef Checkoff recipe contest because I think it stands a good chance of winning. Unfortunately, the nap I took this evening took a little too long and I didn’t post it in time. It’s ok though, I’m more interested in sharing it with you all because it’s awesome.

I had leftover steak from this recipe and wanted to use it to create a breakfast recipe. The frittata I came up with is pretty legit and takes only a few minutes to make!

  
Ingredients:

(serves 4)

8 oz leftover cooked steak, diced small

1/4 cup diced onion

1/4 cup diced bell pepper

1 tablespoon canola oil

Half a medium zucchini, grated

1 clove garlic, minced

1 tablespoon reduced sodium soy sauce

6 eggs

1/4 cup milk

1/4 cup shredded cheddar cheese (optional)

2 tablespoons chopped green onion

Sriracha sauce, for serving

Preparation:

1. Heat canola oil in an oven safe 10″ nonstick skillet over medium-high heat. Sauté the steak, onion, and bell pepper for about 1 minute before adding the zucchini, garlic, and soy sauce. Cook for an additional minute. Turn down the heat to low while performing the next step.

2. Whisk together the eggs and milk in a medium mixing bowl. Pour the egg mixture over the steak and vegetables.

3. Turn the heat up to medium and cook for about 3-5 minutes, or until the bottom of the frittata is set and the top is beginning to set around the edges. Sprinkle with grated cheese and green onion.

4. Transfer the skillet to the oven and broil for another 3-5 minutes, or until the top is golden and the eggs are fully set.

5. Serve immediately with sriracha sauce or allow to cool before storing in the fridge.

Leftover frittatas make great salad toppers! They’re tasty cold, so there’s no need to reheat if you want to save some for the work week. If you decide to freeze this dish, let me know how it is after it defrosts. 

  
I’m pretty sure my skillet isn’t intended to be placed in the oven over 400 degrees. I’m glad the handle didn’t melt! 

  One last thing! If you want to cut some calories from this recipe, use a lean cut of steak, such as flank or skirt steak, and swap 3 of the eggs with 6 egg whites. You probabaly won’t even taste the difference. 

Thai Marinated Skirt Steak

*By posting this recipe I am entering a recipe contest sponsored by The Beef Checkoff and am eligible to win prizes associated with the contest. I was not compensated for my time.

If you’re a regular around my blog, you’ve probably noticed that I am a protein fiend. It’s my favorite macronutrient by far! Here are a few ways that protein promotes weight loss:

1. PROTEIN SATISFIES: Protein is important because it helps you feel fuller longer. Having protein around slows down digestion making us more satisfied and less likely to go back for seconds or snack shortly after a meal.

2. PROTEIN MELLOWS CARB HIGHS AND LOWS: Pairing protein with carbohydrate-rich foods slows down the absorption of sugar from your stomach into your bloodstream, which may help keep your blood sugar and insulin from spiking and ward off future cravings.

3. PROTEIN TAKES MORE CALORIES TO BURN: The “thermic effect of food” (TEF) is the energy we use to digest food into small, absorbable components. Protein has a higher TEF compared to carbs and fat meaning you’re actually burning more calories to process protein than to process the other two.

4. PROTEIN SUPPORTS MUSCLE GROWTH AND REPAIR: Your protein needs increase especially after bouts of intense exercise so increasing your protein intake on days that you exercise is beneficial. Additionally, if you strength train consider having a high protein snack right after a training session when the muscle is sensitive to nutrients that it can use to repair and grow.

Check out this awesome infographic from The Beef Checkoff illustrating some of the ways to harness the benefits of lean protein. 

  Red meat, such as beef, can fit in a healthy diet! Choose lean cuts of beef, such as flank or skirt steak, or explore other lean cuts using this tool. This week I tried out three different steak marinades. Of those three, this was my favorite because of the savory, sweet glaze it forms on the meat and how well it tenderizes the steak. Have it for dinner and use the leftovers in another recipe the next day! 

  
Thai Marinated Grilled Skirt Steak 

(Serves 2 – 4)

Ingredients:

1/4 cup dark brown sugar

2 tablespoons water

2 tablespoons canola oil

1 tablespoon fish sauce

1 tablespoon reduced sodium soy sauce

1 tablespoon lime juice (about half a lime)

1 garlic clove, grated on a microplane

1/2 inch ginger root, grated on a microplane

1 teaspoon chili powder

1 pound skirt steak

Preparation:

1. Whisk together all marinade ingredients in a small bowl. 

2. Place the skirt steak in a gallon sized zip top bag and pour in the marinade. Press air out of the bag as you seal it and store on a plate in the refrigerator for 2-8 hours.

3. Remove the steak from the refrigerator and bring to room temperature as you preheat the grill to high heat on one end and low heat on the other side.

4. Shake excess marinade off the steak before placing on the preheated grill grates. Sear on the hot side first for 3 minutes on each side, then transfer to the low heat side until the internal temperature reaches 125 degrees for a steak cooked to medium-rare or 135 degrees for a steak cooked to medium.

5. Allow the steak to rest for 5 minutes before carving. Slice thin, against the grain to serve.

A 4 oz portion of this grilled steak will have between 200 and 250 calories depending on the amount of marinade on it and 28 grams of protein! You can use flank steak instead for a very similar protein and calorie profile. Enjoy!